A8Bot V10 - Part 2
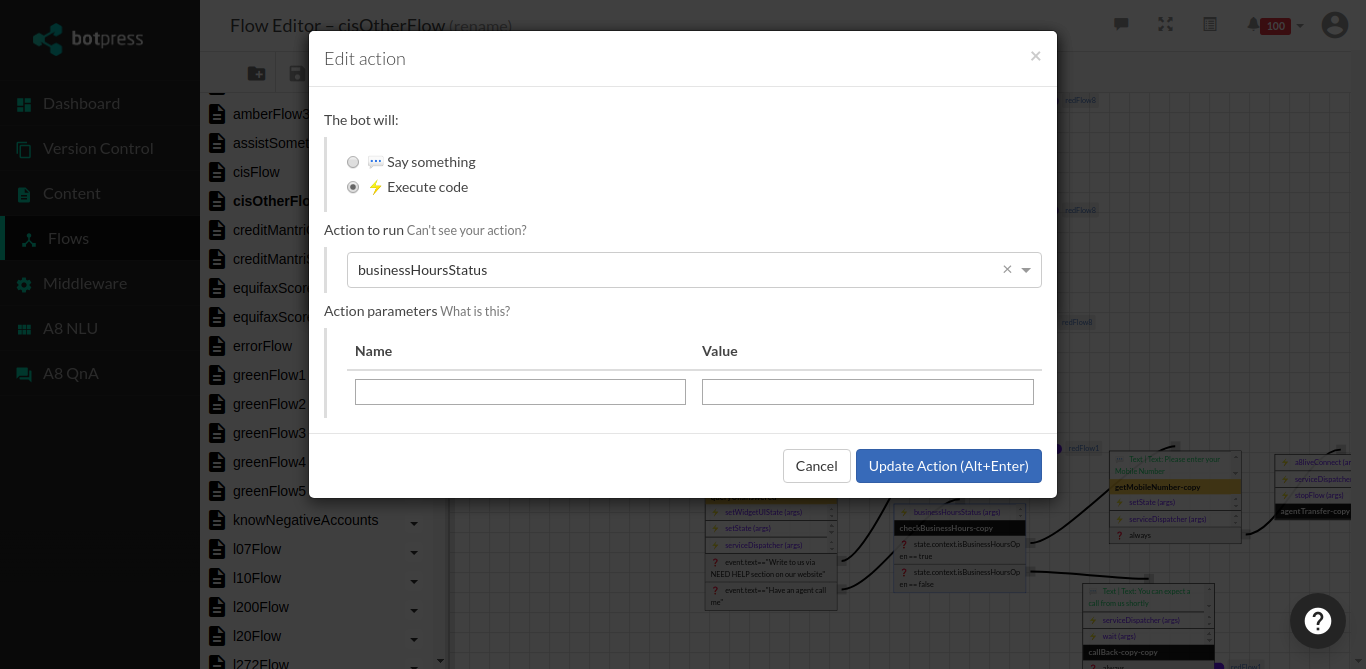
setWidgetUIState
In the setWidgetUIState, we will be able to control the actions of the keyboard, agentTransfer, and attachment.
Step 1: In the flow, select Execute code.
Step 2: A pop-up window will appear below. Select setWidgetUIState and type the required name and value.
For reference the sample text are:
- keyboard: enable
- agentTransfer: disable
- attachment: disable
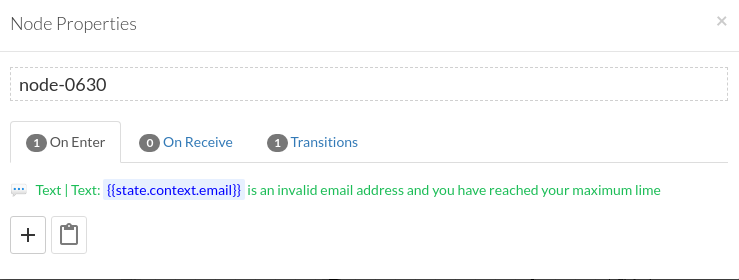
( With the Help of setWidgetUIState, we can Hide, Enable, and Disable the keyboard, agentTransfer, and attachment)
Output
BusinessHoursStatus
This is used to check the working hours of an Agent.
Step 1: In the flow, select the Execute code. A pop-up window will appear. Select businessHoursStatus from the drop-down list under Action to run. Now, click Update Action(Alt+Enter).
It is important to set up a create SimpleChoice in the Transition tab.
Step 2: Click on the + icon to open the transition tab. Raw expressions have to be added for each choice in the simple choice form.
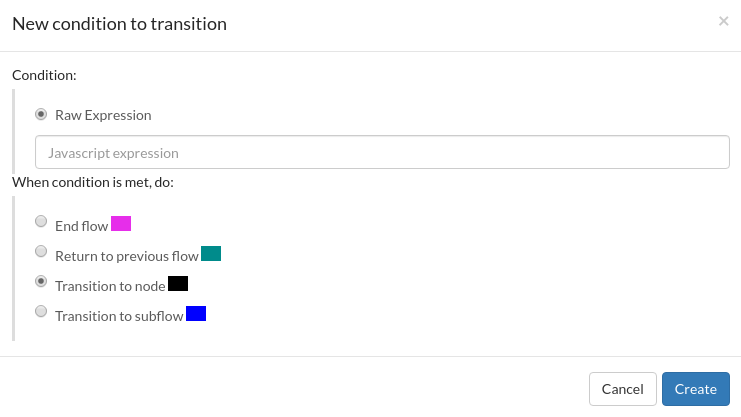
Step 3: In the Transitions tab, select the required format.
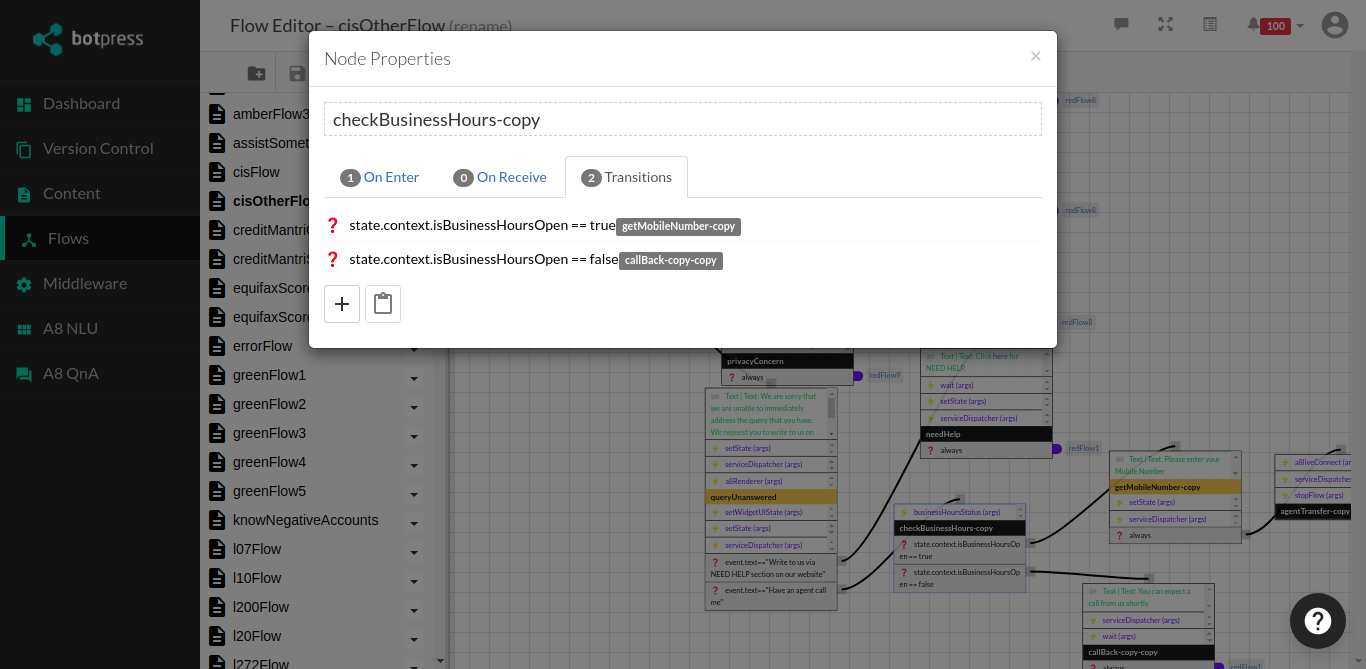
Step 4: After creating the transitions in the previous node, navigate to the next node to create a8liveConnect. This helps to connect to the live agent. Now, click Update Action(Alt+Enter)
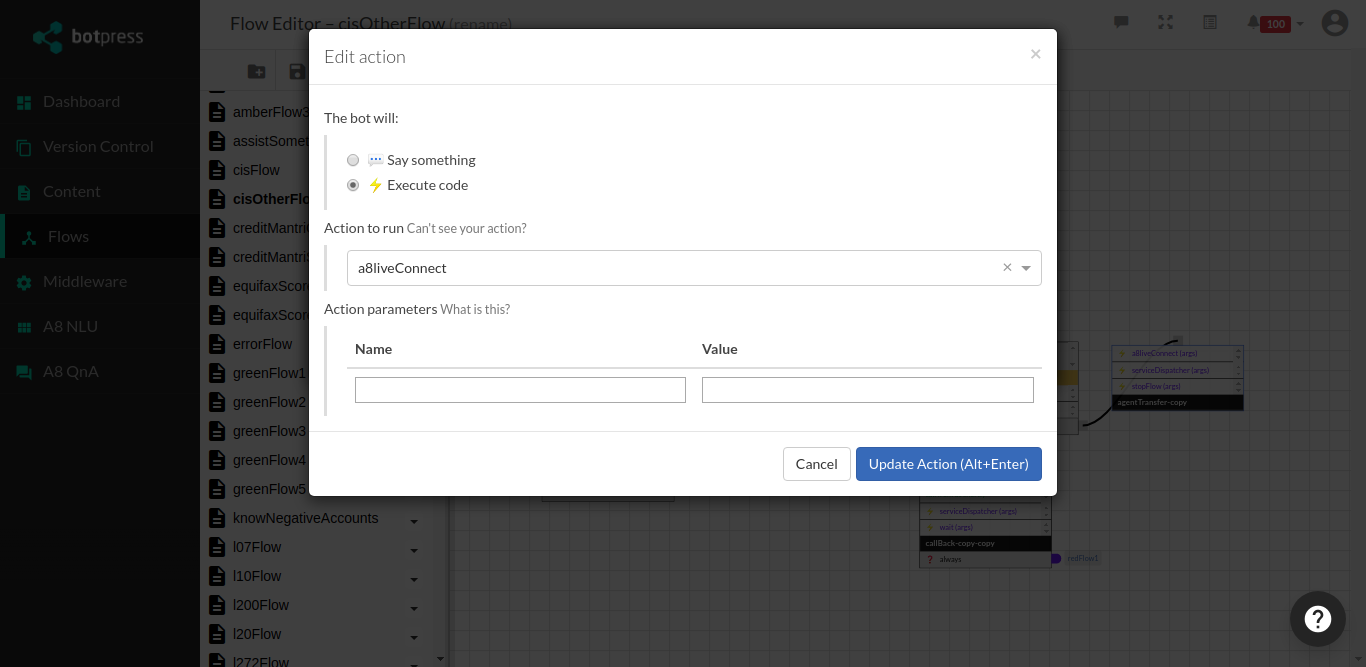
a8liveConnect
This is used to connect the user to an Agent. a8liveConnect can be set up in the flow.
Step 1: In the flow, select Execute code under The bot will:.
Step 2: Select a8liveConnect from the drop-down list under Action to run.
Step 3: Click Update Action(Alt+Enter).
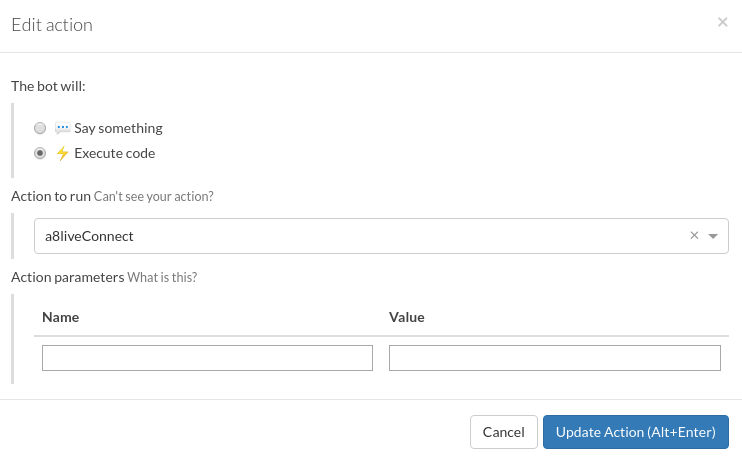
a8liveConnect-Group Based Transfer
This is used to transfer the chat to an agent in a different group of an agent. It is done using groupId in a8liveConnect.
Step 1: In the flow, select Execute code under The bot will:.
Step 2: Select a8liveConnect from the drop-down list under Action to run.
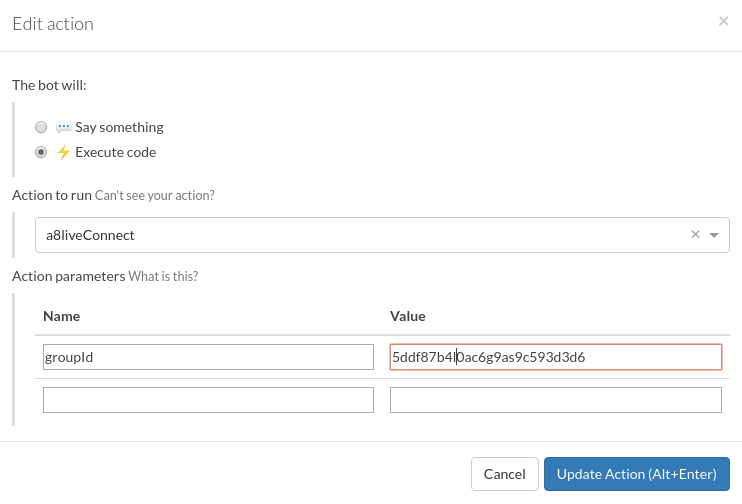
Step 3: In the Action parameters section, fill in the necessary details under Name and Value respectively. Enter the groupId value in Value.
groupId: 5ddf87b4l0ac6g9as9c593d3d6
Step 4: Click Update Action(Alt+Enter).
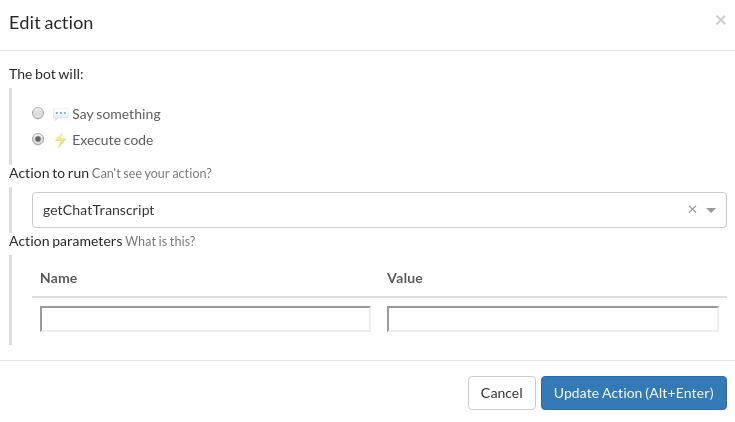
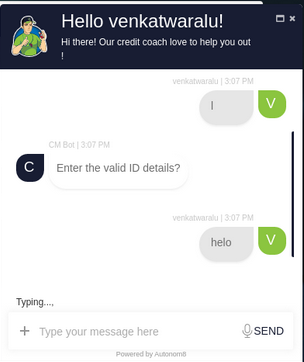
getChatTranscript
This is used to get the interaction between an user and the bot in the mail with the help of getChatTranscript.
Step 1: Create Service.
- Service: While creating serviceDispatcher, create a Service and Service Handler in A8QnA.
Step 2: Enter a service and select a service handler from the drop-down list in Default Service Handler.
function doTask(params, state) {
    return new Promise((resolve, reject) => {
        console.log("Inside Weather service");
       a8service.getChatTranscript(state._stateId.split(":")[1]).then(chats => {
                  console.log(chats);
                  let mailData = {
                  mailTemplate: `<!DOCTYPE html>
                                  <html lang="en">
                                  <head>
                                  </head>
                                  <body>
                                      <div class="chats">
                                          <p>Hi.</p>
                                          <br>
                                          <p>
                                              This is an automated email from Autonom8's.
                                          </p>
                                          <p>
                                              Thanks,<br><b>Team Autonom8</b>
                                          </p>
                                      </div>
                                  </body>
                                </html>`,
                  toMailID: 'venkateshwaralu@autonom8.com',
                  subject: 'Test mail for service',
                  attachments: [ {   // use URL as an attachment
                                    filename: 'ChatTranscript.txt',
                                    content: JSON.stringify(state.context.getChatTranscript, '',4)
                                }]
                };
                  // If you are going to use autonom8 mail service
                  a8service.sendMail(mailData).then(info => {
                    console.log(info);
                    resolve({'sendMail': true});
                  });

                  // If you are going to use your own mail serivce
                  let mailConfig = {
                    service: 'gmail',
                    fromId: 'test@gmail.com',
                    password: 'password'
                  }
                  a8service.sendMail(mailConfig, mailData).then(info => {
                    console.log(info);
                    resolve({'sendMail': true});
                  });
                });
    });
}
- Service Handler: In Service Handler, create a Handler and select the service that has to be linked with the Service Handler in A8QnA.
function doTask(params, state) {
    return new Promise((resolve, reject) => {
        if (params.sendMail) {
            resolve({
            "sendMail":params.sendMail
            });
        } else if (params.error) {
            resolve({
              "sendMail":params.error
            });
        }
    });
}
Step 3: In the flow, select Execute code under The bot will:.
Step 4: Select serviceDispatcher from the drop-down list under Action to run.
Step 5: In the Action parameters section, fill in the necessary details under Name and Value respectively.
serviecName: weather
context: {}
Step 6: Click Update Action(Alt+Enter).
Step 7: After creating the servieDispatcher, set and print the sevice with the format state.nodename.servicename.value. Service can be printed using this format in the flow.
Step 8: In the next node, set getChatTranscript. It is used to send the conversion as a mail.
Step 9: In the flow, select Execute code.
Step 10: Select getChatTranscript from the drop-down list under Action to run.
Step 11: Click Update Action(Alt+Enter).
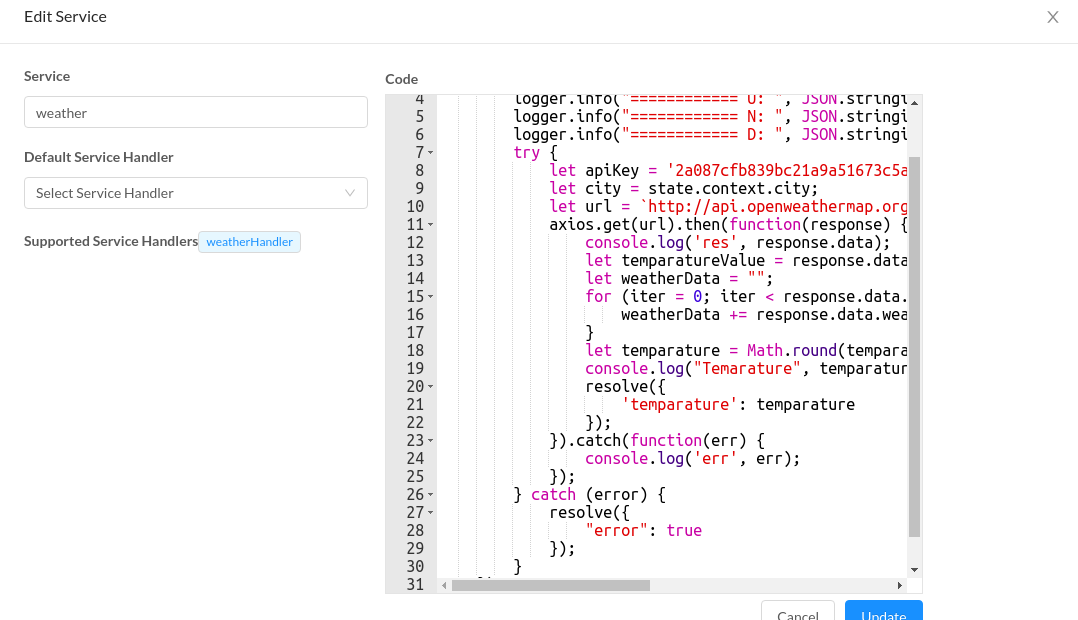
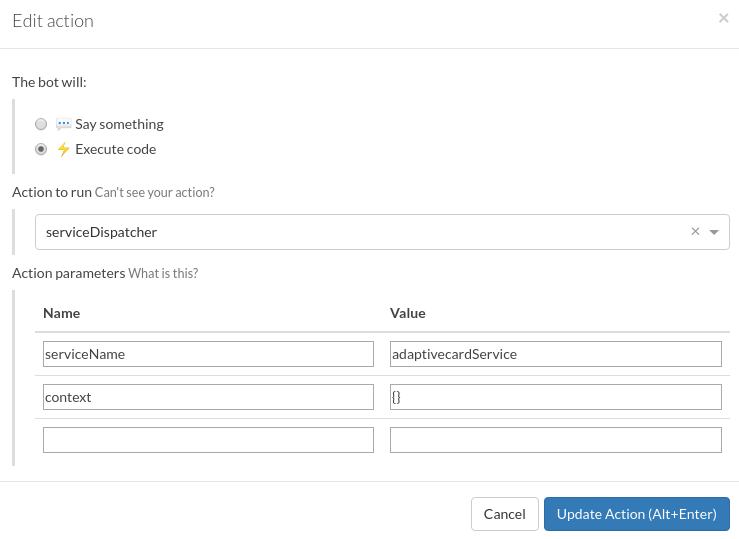
serviceDispatcher
- Service
While creating serviceDispatcher, create a Service and Service Handler in A8QnA.
function doTask(params, state) {
    return new Promise((resolve, reject) => {
        logger.info("Inside Weather service");
        logger.info("============ U: ", JSON.stringify(state.context.userInfo));
        logger.info("============ N: ", JSON.stringify(state.context.nlu));
        logger.info("============ D: ", JSON.stringify(state.context.deviceInfo));
           try {
            let apiKey = '2a087cfb839bc21a9a51673c5a2e606e';
            let city = state.context.city;
            let url = `http://api.openweathermap.org/data/2.5/weather?q=${city}&appid=${apiKey}`;
            axios.get(url).then(function(response) {
                console.log('res', response.data);
                let temparatureValue = response.data.main.temp - 273.15;
                let weatherData = "";
                for (iter = 0; iter < response.data.weather.length; iter++) {
      weatherData += response.data.weather[iter].description + ",";
 }
                let temparature = Math.round(temparatureValue) + '°C' +" "+"with "+ weatherData.slice(0, -1) + ".";
                console.log("Temarature", temparature);
                resolve({
                    'temparature': temparature
            });
            }).catch(function(err) {
                console.log('err', err);
            });
            } catch (error) {
            resolve({
                "error": true
            });
            }
            });
}
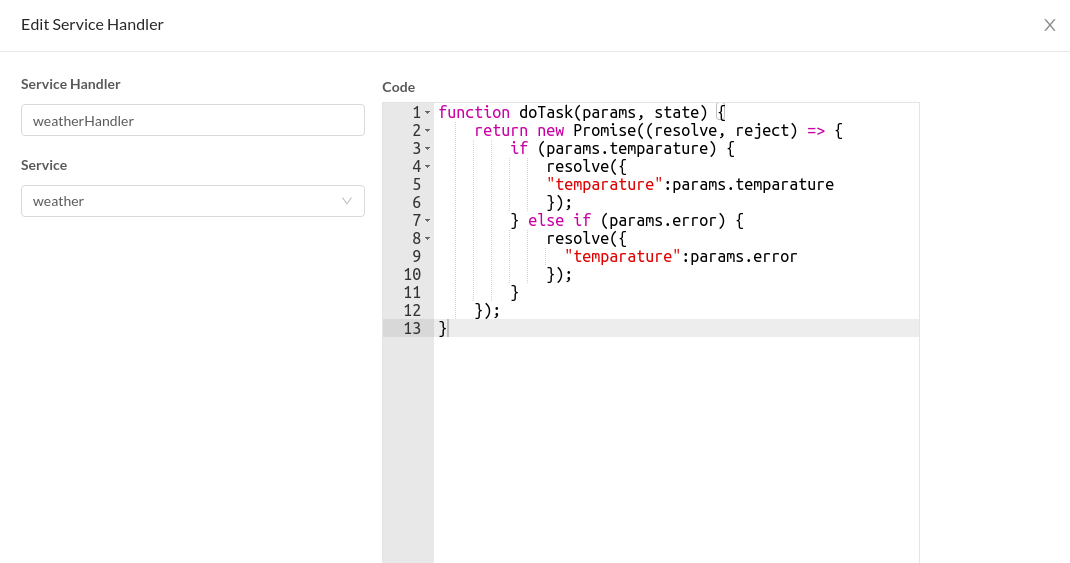
- Service Handler
While creating Service Handler, create a Handler and select the service that has to be linked to the Service Handler in A8QnA.
function doTask(params, state) {
    return new Promise((resolve, reject) => {
        if (params.temparature) {
            resolve({
            "temparature":params.temparature
            });
        } else if (params.error) {
            resolve({
              "temparature":params.error
            });
        }
    });
}
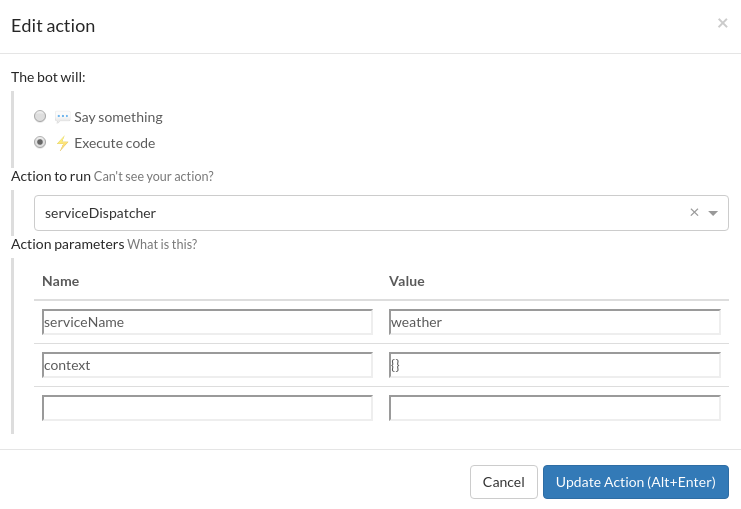
Step 1: In the flow, select Execute code under The bot will:.
Step 2: Select serviceDispatcher from the drop-down list under Action to run.
Step 3: In the Action parameters section, fill in the necessary details under Name and Value respectively.
serviecName: weather
context: {}

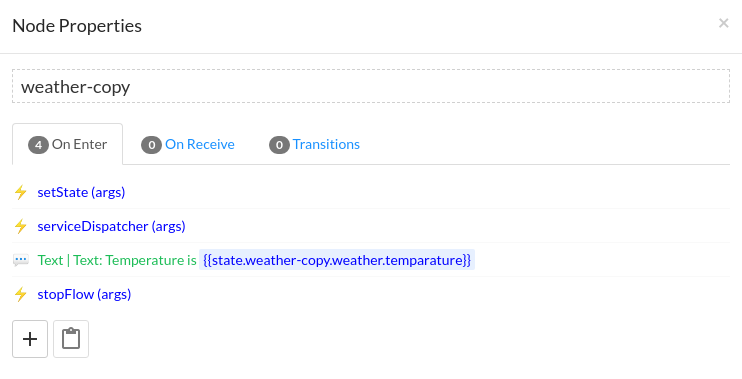
Step 4: After creating the servieDispatcher, set and print the sevice using the format state.nodename.servicename.value.
Service can be printed using this format in the flow.
Output
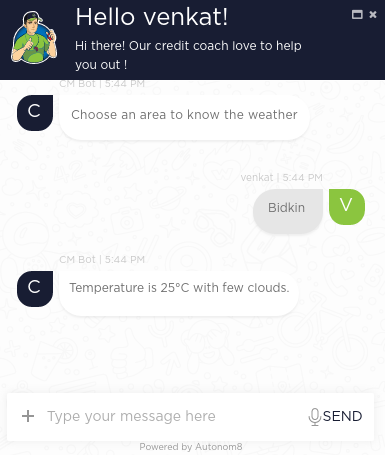
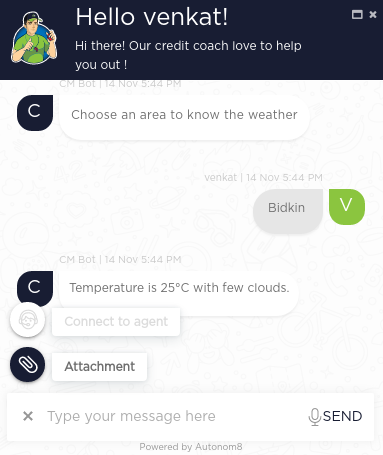
nlpService(intent)
This is used to check if the given message by the user is trained by the LUIS. This allows us to detect the intent and entities. With the help of the Intent, we can navigate the flow given in the transition.
Step 1: In the flow, select Execute code under The bot will:.
Step 2: Select setState from the drop-down list under Action to run.
Step 3: In the Action parameters section, fill in the necessary details under Name and Value respectively.
email: {{event.text}}
Step 4: In the Transition tab, set the created SimpleChoice.
Step 5: Click + icon to open the transition tab and add the raw expressions for each choice in the SimpleChoice form.
The sample raw expression is given below for your reference.
state.context.nlp.intent.name=="value which we need to check"
nlpService(entites)
This is used to check if the given message by the user is trained by the LUIS. This allows us to detect the intent and entities. With the help of the Intent, we can navigate the flow given in the transition.
Step 1: In the flow, select Execute code under The bot will:.
Step 2: Select nlpService from the drop-down list under Action to run.
Step 3: In the Action parameters section, fill in the necessary details under Name and Value respectively.
context: {"query":"{{event.text}}"}
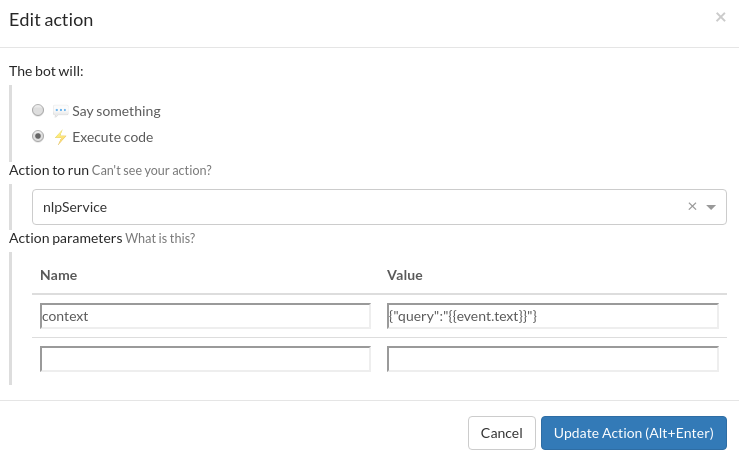
Step 4: Click Update Action(Alt+Enter).
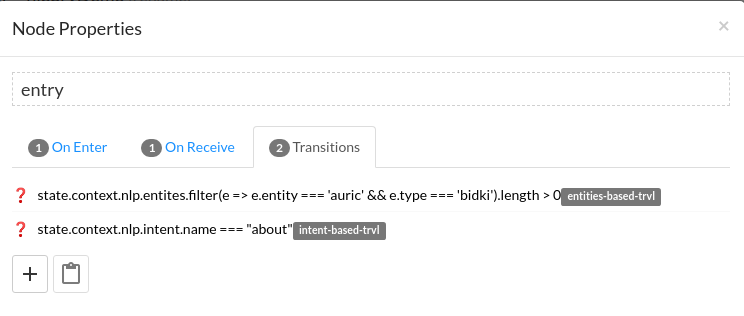
Step 5: In the Transition tab, set the created SimpleChoice.
Step 6: Click + icon to open the transition tab and add the raw expressions for each choice in the SimpleChoice form.
The sample raw expression is given below for your reference.
Step 7: Under Config, we can get the entity and type ENDURL.
The format is given below for reference.
https://{AppRegion}.api.cognitive.microsoft.com/luis/v2.0/apps/{AppId}?verbose=true&timezoneOffset=-360&subscription-key={AppSecret}&q="Intent name"
Step 8: With the help of ENDURL, we can see responses of the entites. They can create its structure in the Transition.
The sample raw expression is given below for your reference.
state.context.nlp.entites.filter(e => e.entity === 'auric' && e.type === 'bidkin').length > 0
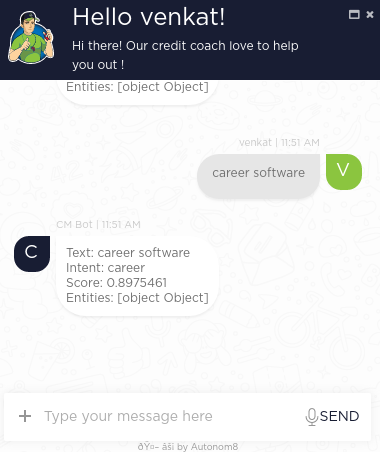
nlu
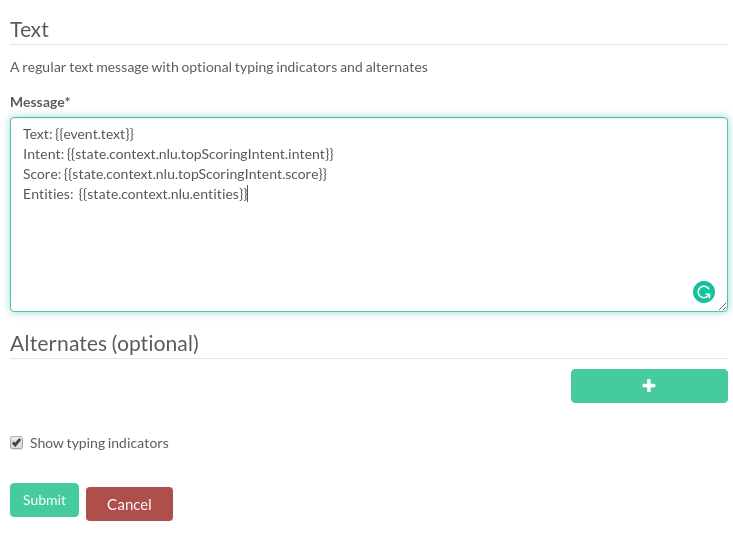
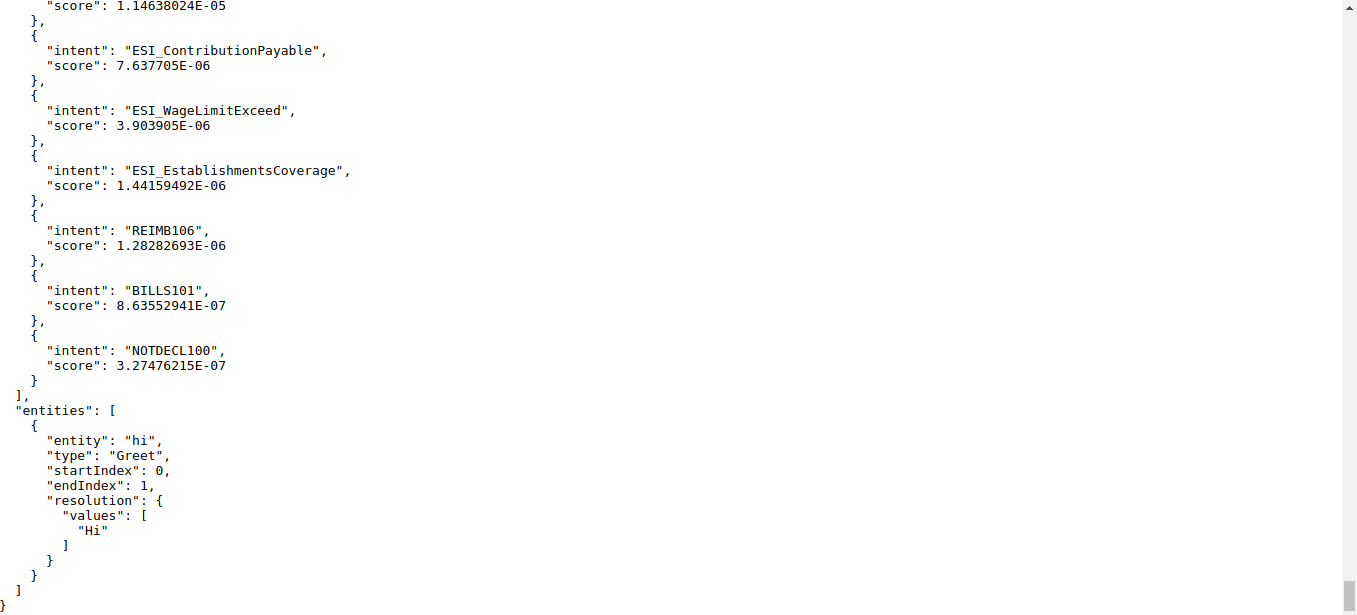
This is used to get the Intent name, Intent Score, Entities, and text that we use to enter in the widget.
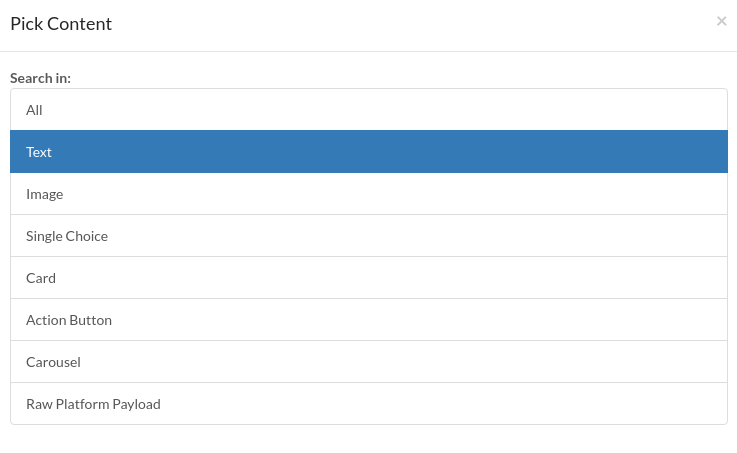
Step 1: In the flow, select Say something under The bot will:.
Step 2: A pop-up box will appear. Select Text.
- To print the given message entered by the user, use {{event.text}}.
- To print the Intent name, use {{state.context.nlu.topScoringIntent.intent}}.
- To print the Score, use {{state.context.nlu.topScoringIntent.score}}.
- To print the Entites name, use {{state.context.nlu.entities}}.
Output
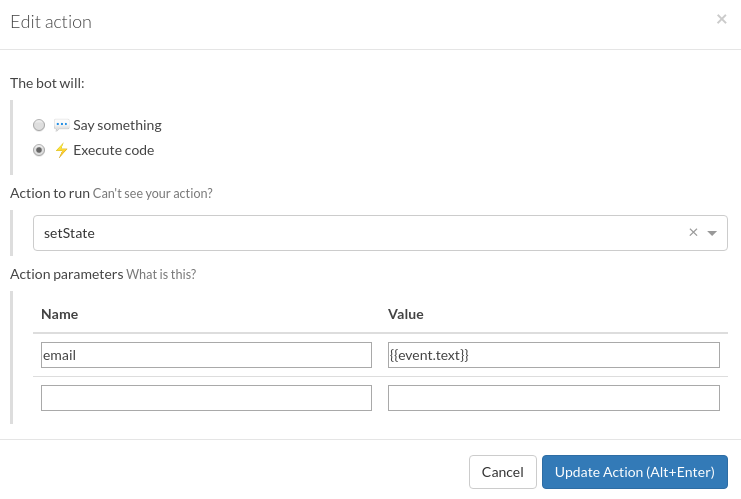
setState
This is used to store the values that are required in the next node or anywhere in the node in a flow.
Step 1: In the flow, select Execute code under The bot will:.
Step 2: Select nlpService from the drop-down list under Action to run.
Step 3: In the Action parameters section, fill in the necessary details under Name and Value respectively.
context: {"query":"{{event.text}}"}
Step 4: Click Update Action(Alt+Enter).
Step 5: After selecting the setState in the next node, print the setState value by state.context.email.
setStateJS
This is used to execute an expression. For example parseInt(context.internalEmailCounter)+1.
Step 1: In the flow, select Execute code under The bot will:.
Step 2: Select setStateJS from the drop-down list under Action to run.
Step 3: In the Action parameters section, fill in the necessary details under Name and Value respectively.
counter: parseInt("{{state.context.counter}}")+1
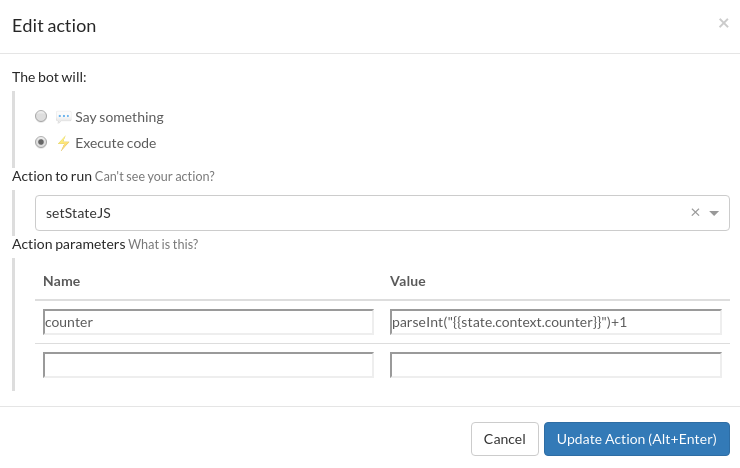
Step 4: Click Update Action(Alt+Enter).
Step 5: In the next node, print the created setState.js. The format is state.context.setState.js name.
Step 6: In setStateJS, we can store the value in the variable and use it in the different nodes in the same flow. In setState.js, we store the value as we use single quotes.

Wait
This allows us to wait while traveling from one node to another or it also allows as to wait with in the node.
Step 1: In the flow, select Execute code under The bot will:.
Step 2: Select wait from the drop-down list under Action to run.
Step 3: In the Action parameters section, fill in the necessary details under Name and Value respectively.
Step 4: Click Update Action(Alt+Enter).

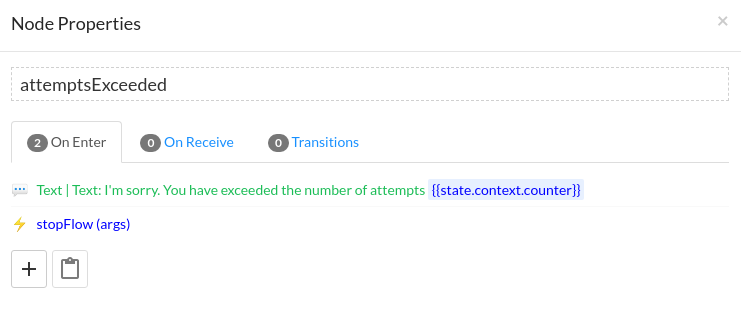
TypingIndicator
This is used to show the Indication before the message is displayed from that next node in the Flow.
Step 1: In the flow, select Execute code under The bot will:.
Step 2: Select typingIndicator from the drop-down list under Action to run.
Step 3: In the Action parameters section, fill in the necessary details under Name and Value respectively.
waitTime: 1000
Step 4: Click Update Action(Alt+Enter).

Output
Cardchoice-Dynamic
- Service
While creating serviceDispatcher, we need to create a Service and Service Handler in A8QnA.
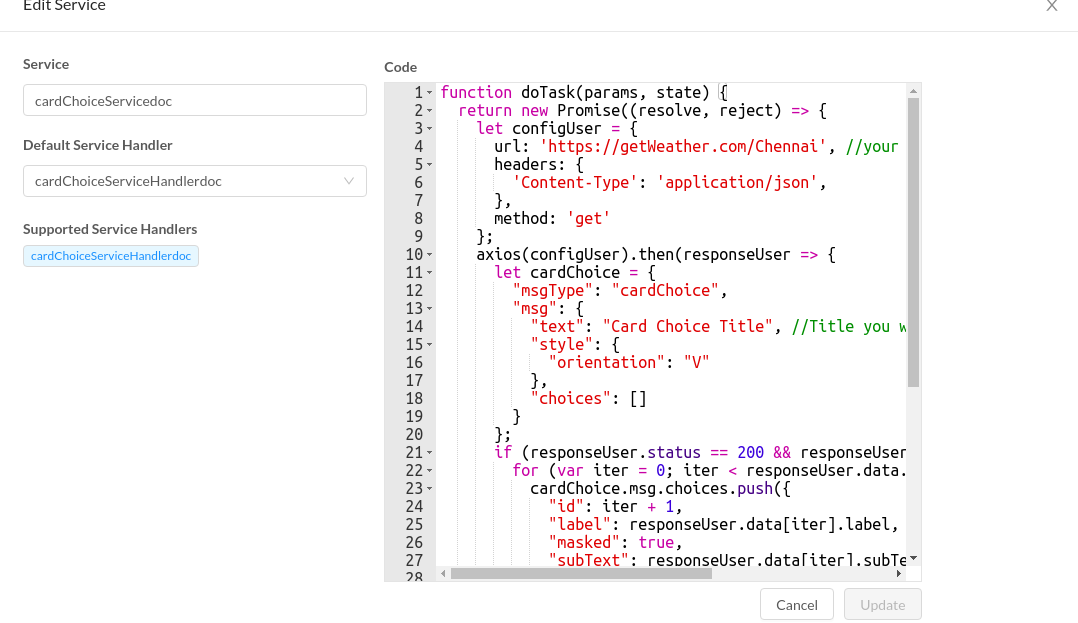
function doTask(params, state) {
  return new Promise((resolve, reject) => {
    let configUser = {
      url: 'https://getWeather.com/Chennai', //your API url
      headers: {
        'Content-Type': 'application/json',
      },
      method: 'get'
    };
    axios(configUser).then(responseUser => {
      let cardChoice = {
        "msgType": "cardChoice",
        "msg": {
          "text": "Card Choice Title", //Title you want to display in your Card Choice
          "style": {
            "orientation": "V"
          },
          "choices": []
        }
      };
      if (responseUser.status == 200 && responseUser.data !== null) {
        for (var iter = 0; iter < responseUser.data.length; iter++) {
          cardChoice.msg.choices.push({
            "id": iter + 1,
            "label": responseUser.data[iter].label,
            "masked": true,
            "subText": responseUser.data[iter].subText,
            "location": responseUser.data[iter].location,
            "zipCode": responseUser.data[iter].zipCode
          });
        }
        resolve({
          "cardChoice": cardChoice
        });
      }
    }).catch(error => {
      console.log("Error in service");
      console.log("Error:", error);
      resolve({
        "error": true
      });
    });
  });
}
- Services Handler
In Service Handler, we need to create a Handler and select the service that has to be linked with the Service Handler in A8QnA.
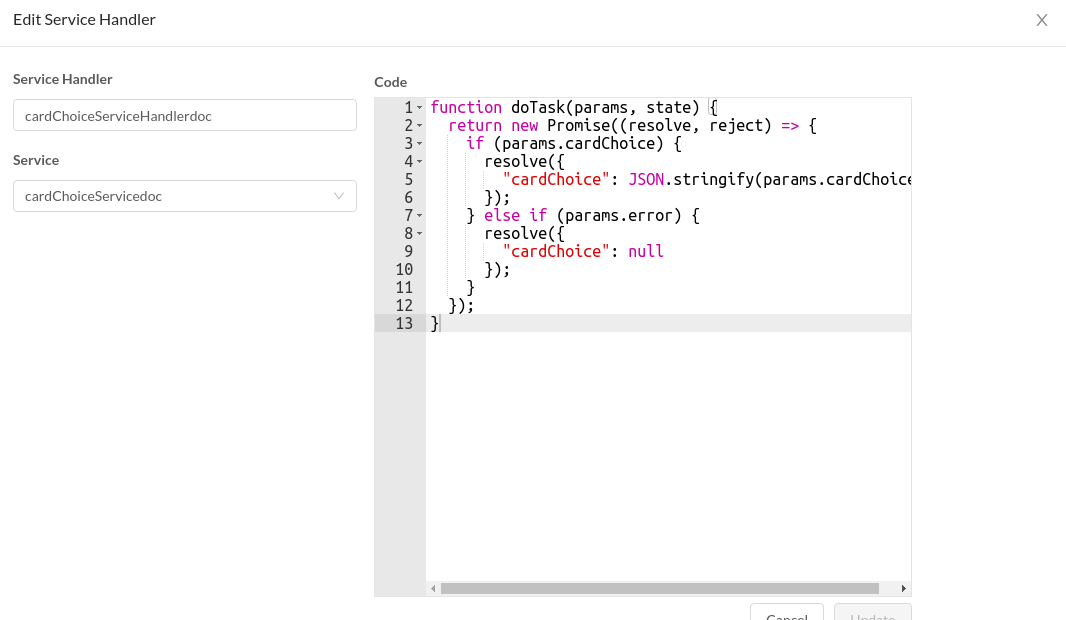
function doTask(params, state) {
  return new Promise((resolve, reject) => {
    if (params.cardChoice) {
      resolve({
        "cardChoice": JSON.stringify(params.cardChoice)
      });
    } else if (params.error) {
      resolve({
        "cardChoice": null
      });
    }
  });
}
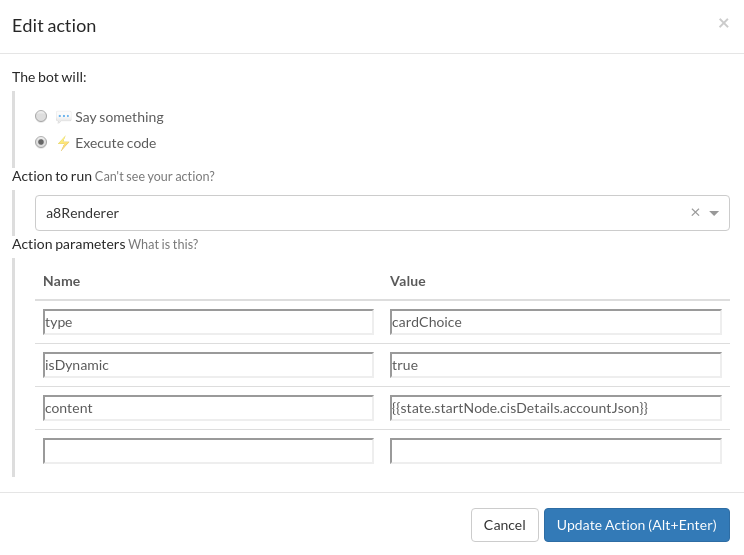
Step 1: In the flow, select Execute code under The bot will:.
Step 2: Select a8Renderer from the drop-down list under Action to run.
Step 3: In the Action parameters section, fill in the necessary details under Name and Value respectively.
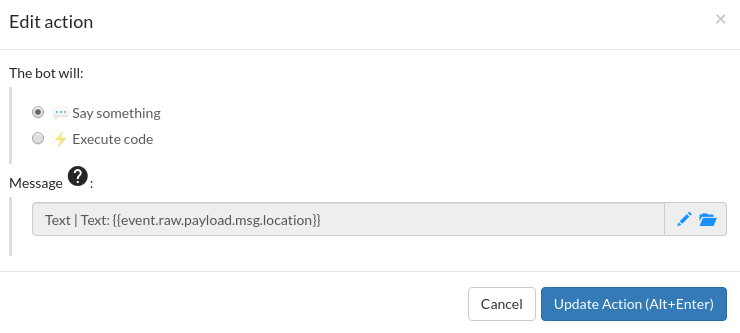
Sample references are give in the image below.
Step 4: To get the value given in the service, select Say something. After selecting, the value has to be provided in the service.
event.raw.payload.msg.value
Step 5: Click Update Action(Alt+Enter).
Simplechoice-Dynamic
- Service
While creating serviceDispatcher, we need to create a Service and Service Handler in A8QnA.
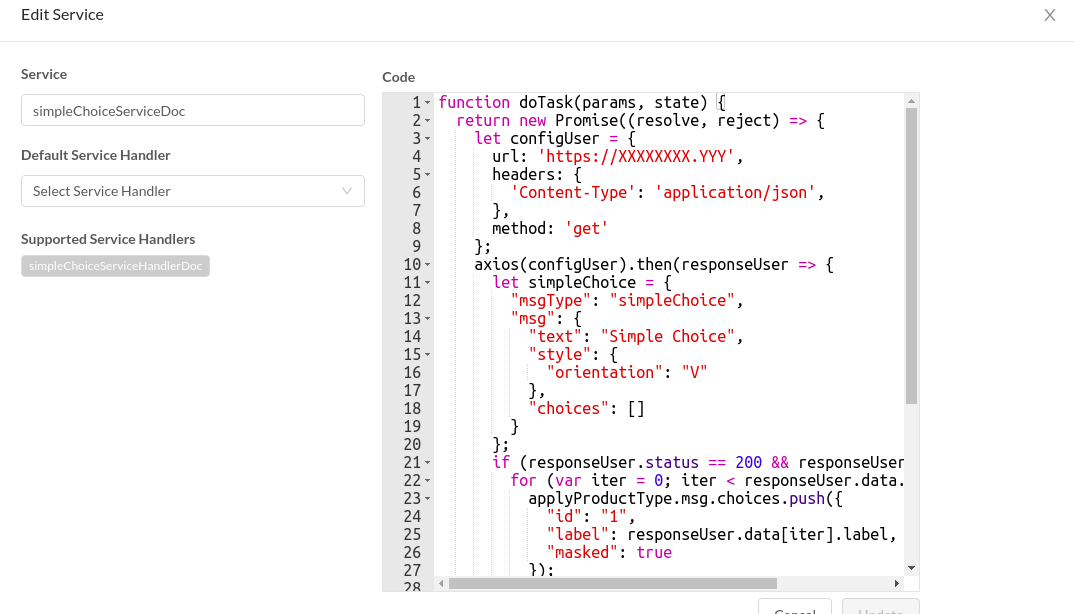
function doTask(params, state) {
  return new Promise((resolve, reject) => {
    let configUser = {
      url: 'https://XXXXXXXX.YYY',
      headers: {
        'Content-Type': 'application/json',
      },
      method: 'get'
    };
    axios(configUser).then(responseUser => {
      let simpleChoice = {
        "msgType": "simpleChoice",
        "msg": {
          "text": "Simple Choice",
          "style": {
            "orientation": "V"
          },
          "choices": []
        }
      };
      if (responseUser.status == 200 && responseUser.data !== null) {
        for (var iter = 0; iter < responseUser.data.length; iter++) {
          applyProductType.msg.choices.push({
            "id": "1",
            "label": responseUser.data[iter].label,
            "masked": true
          });
        }
        resolve({
          "simpleChoice": simpleChoice
        });
      }
    }).catch(error => {
      console.log("Error in service");
      console.log("Error:", error);
      resolve({
        "error": true
      });
    });
  });
}
- Services Handler
In Service Handler, we need to create a Handler and select the service that has to be linked with the Service Handler in A8QnA.
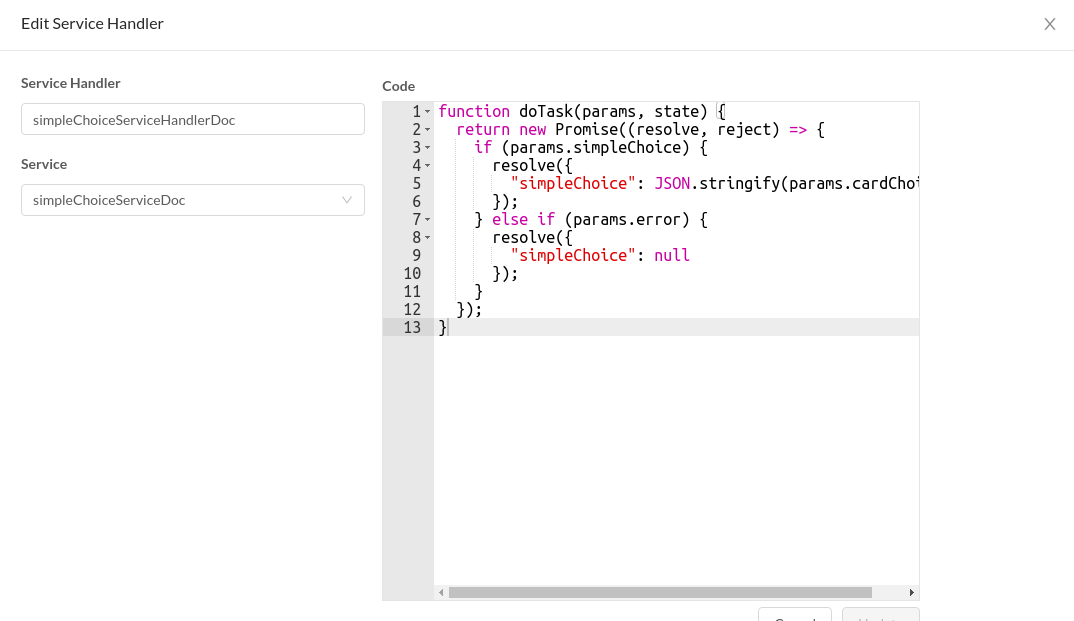
function doTask(params, state) {
  return new Promise((resolve, reject) => {
    if (params.simpleChoice) {
      resolve({
        "simpleChoice": JSON.stringify(params.cardChoice)
      });
    } else if (params.error) {
      resolve({
        "simpleChoice": null
      });
    }
  });
}
Step 1: In the flow, select Execute code under The bot will:.
Step 2: Select a8Renderer from the drop-down list under Action to run.
Step 3: In the Action parameters section, fill in the necessary details under Name and Value respectively.
type: simpleChoice
isDynamic: true
content: state.nodename.servicename.value

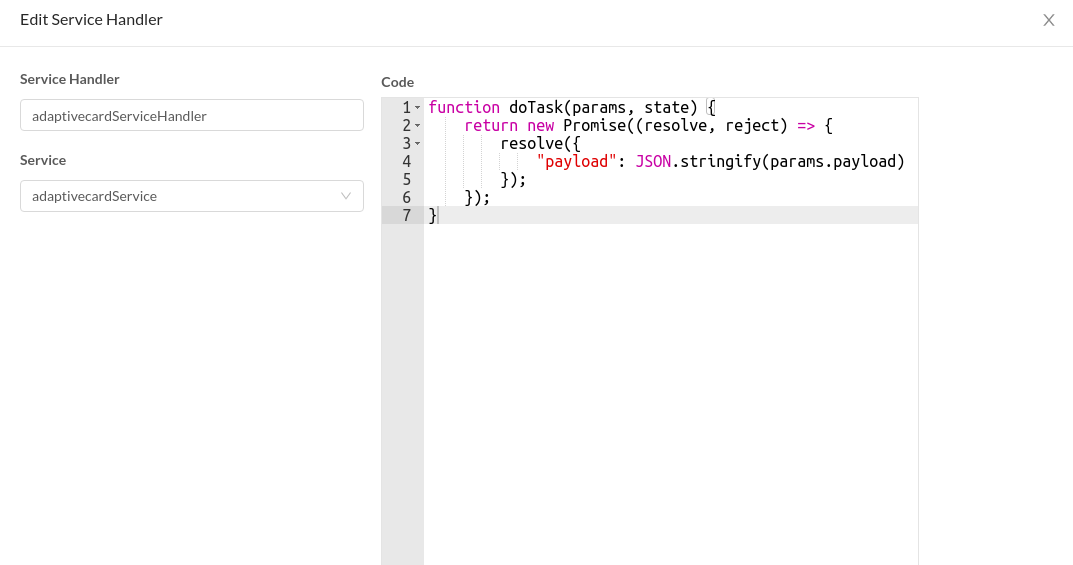
AdaptiveCard-Dynamic
- Service
While creating serviceDispatcher, we need to create a Service and Service Handler in A8QnA.
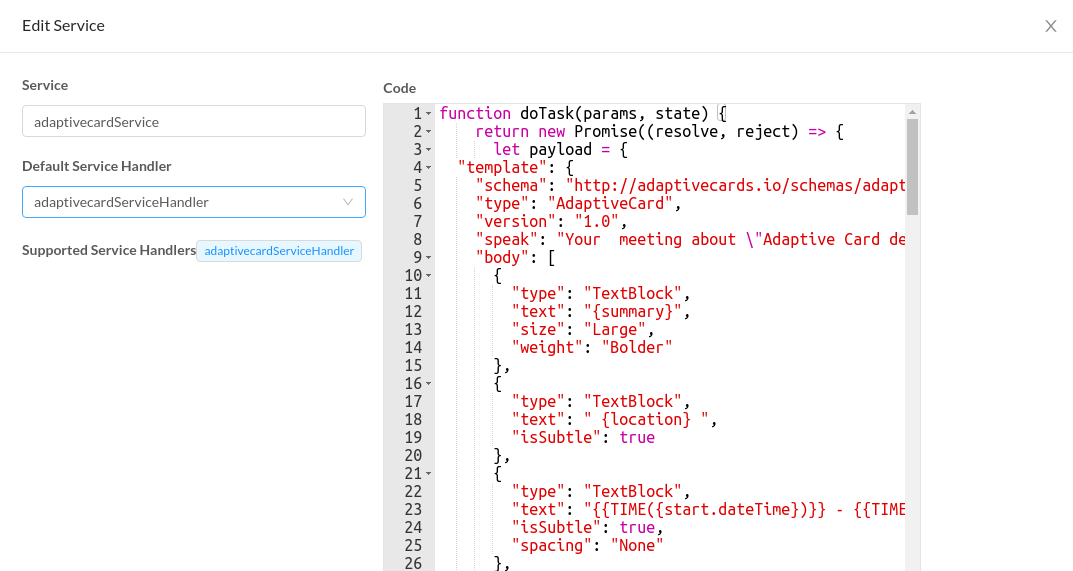
function doTask(params, state) {
    return new Promise((resolve, reject) => {
      let payload = {
  "template": {
    "schema": "http://adaptivecards.io/schemas/adaptive-card.json",
    "type": "AdaptiveCard",
    "version": "1.0",
    "speak": "Your  meeting about \"Adaptive Card design session\" is starting at 12:30pmDo you want to snooze  or do you want to send a late notification to the attendees?",
    "body": [
      {
        "type": "TextBlock",
        "text": "{summary}",
        "size": "Large",
        "weight": "Bolder"
      },
      {
        "type": "TextBlock",
        "text": " {location} ",
        "isSubtle": true
      },
      {
        "type": "TextBlock",
        "text": "{{TIME({start.dateTime})}} - {{TIME({end.dateTime})}}",
        "isSubtle": true,
        "spacing": "None"
      },
      {
        "type": "TextBlock",
        "text": "Snooze for"
      },
      {
        "type": "Input.ChoiceSet",
        "id": "snooze",
        "value": "{reminders.overrides[0].minutes}",
        "choices": [
          {
            "title": "{reminders.overrides[0].minutes} minutes",
            "value": "{reminders.overrides[0].minutes}"
          },
          {
            "title": "{reminders.overrides[1].minutes} minutes",
            "value": "{reminders.overrides[1].minutes}"
          },
          {
            "title": "{reminders.overrides[2].minutes} minutes",
            "value": "{reminders.overrides[2].minutes}"
          }
        ]
      }
    ],
    "actions": [
      {
        "type": "Action.Submit",
        "title": "Snooze",
        "data": {
          "x": "snooze"
        }
      },
      {
        "type": "Action.Submit",
        "title": "I'll be late",
        "data": {
          "x": "late"
        }
      }
    ]
  },
  "data": {
    "kind": "calendar#event",
    "etag": "\"3007572097704000\"",
    "id": "_6sp3gdjcksmab9kc4rgq1aldjelm8chhcgp66phocg_20191105T150000Z",
    "status": "confirmed",
    "htmlLink": "https://www.google.com/calendar/event?eid=XzZzcDNnZGoxNjBxamdiYjRja3NtYWI5a2M0cmplYjlwNjhyM2diOXA2Z3FtOGNoaGNncDY2cGhvY2dfMjA2xO1UwMDAuZ0Bt",
    "created": "2016-12-29T06:35:05.000Z",
    "updated": "2018-04-24T14:04:50.184Z",
    "summary": "Adaptive Card design session",
    "location": "Conf Room 112/3377 (10)",
    "creator": {
      "email": "sundance@outlook.com",
      "displayName": "John Doe",
      "self": true
    },
    "organizer": {
      "email": "sundance@outlook.com",
      "displayName": "John Doe",
      "self": true
    },
    "start": {
      "dateTime": "2019-11-05T12:30:00-08:00",
      "timeZone": "America/Los_Angeles"
    },
    "end": {
      "dateTime": "2019-11-05T13:30:00-08:00",
      "timeZone": "America/Los_Angeles"
    },
    "recurringEventId": "_6sp3gdj160qjgbb4cksmab9kc4rjeb9p68r3gb9p6gqm8chhcgp66phocg",
    "originalStartTime": {
      "dateTime": "12:30",
      "timeZone": "America/Los_Angeles"
    },
    "visibility": "private",
    "iCalUID": "7286a058-de9e-4a77-9268-945d21d2cf8d",
    "sequence": 4,
    "reminders": {
      "useDefault": false,
      "overrides": [
        {
          "method": "popup",
          "minutes": "5"
        },
        {
          "method": "popup",
          "minutes": "15"
        },
        {
          "method": "popup",
          "minutes": "30"
        }
      ]
    }
  }
}; // This is where u should replace your payload data
        resolve({
            "payload": payload
        });
    });
}
- Services Handler
In Service Handler, we need to create a Handler and select the service that has to be linked with the Service Handler in A8QnA.
function doTask(params, state) {
    return new Promise((resolve, reject) => {
        resolve({
            "payload": JSON.stringify(params.payload)
        });
    });
}
Step 1: In the flow, select Execute code under The bot will:.
Step 2: Select a8Renderer from the drop-down list under Action to run.
Step 3: In the Action parameters section, fill in the necessary details under Name and Value respectively.
type: datatable
isDynamic: true
content: state.nodename.servicename.value
Carousel-Dynamic
- Service
While creating serviceDispatcher, we need to create a Service and Service Handler in A8QnA.
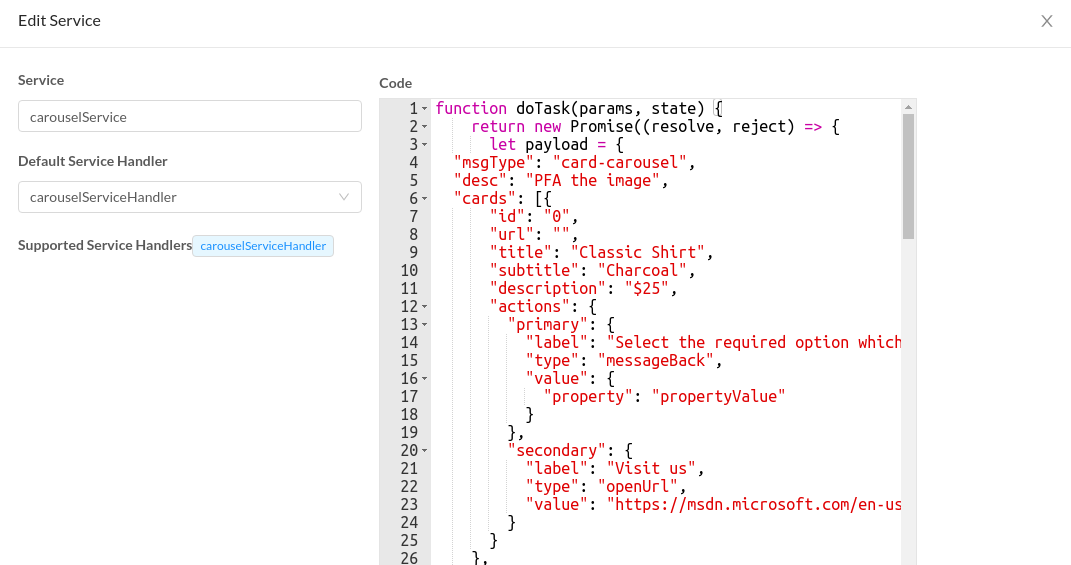
function doTask(params, state) {
    return new Promise((resolve, reject) => {
      let payload = {
    "msgType": "card-carousel",
    "desc": "PFA the image",
    "cards": [{
            "id": "0",
            "url": "",
            "title": "Classic Shirt",
            "subtitle": "Charcoal",
            "description": "$25",
            "actions": {
                "primary": {
                    "label": "Select the required option which required",
                    "type": "messageBack",
                    "value": {
                        "property": "propertyValue"
                    }
                },
                "secondary": {
                    "label": "Visit us",
                    "type": "openUrl",
                    "value": "https://msdn.microsoft.com/en-us/microsoft-teams/tabs"
                }
            }
        },
        {
            "id": "1",
            "url": "https://s3-us-west-2.amazonaws.com/s.cdpn.io/331810/sample87.jpg",
            "title": "Some random product",
            "subtitle": "Charcoal",
            "description": "$35",
            "actions": {
                "primary": {
                    "label": "Submit",
                    "type": "messageBack",
                    "value": {
                        "property": "propertyValue"
                    }
                },
                "secondary": {
                    "label": "Visit us",
                    "type": "openUrl",
                    "value": "https://msdn.microsoft.com/en-us/microsoft-teams/tabs"
                }
            }
        },
        {
            "id": "2",
            "url": "https://s3-us-west-2.amazonaws.com/s.cdpn.io/331810/sample119.jpg",
            "title": "Faded cloth",
            "subtitle": "green",
            "description": "$15",
            "actions": {
                "primary": {
                    "label": "Submit",
                    "type": "messageBack",
                    "value": {
                        "property": "propertyValue"
                    }
                },
                "secondary": {
                    "label": "Visit us",
                    "type": "openUrl",
                    "value": "https://msdn.microsoft.com/en-us/microsoft-teams/tabs"
                }
            }
        },
        {
            "id": "3",
            "url": "https://images.unsplash.com/photo-1575026584098-81500f6835d6?ixlib=rb-1.2.1&q=80&fm=jpg&crop=entropy&cs=tinysrgb&w=1080&fit=max",
            "title": "Shoes",
            "subtitle": "Brown",
            "description": "$225",
            "actions": {
                "primary": {
                    "label": "Submit",
                    "type": "messageBack",
                    "value": {
                        "property": "propertyValue"
                    }
                },
                "secondary": {
                    "label": "Visit us",
                    "type": "openUrl",
                    "value": "https://msdn.microsoft.com/en-us/microsoft-teams/tabs"
                }
            }
        }
    ]
};
logger.info("Carousel:", payload);
        resolve({
            "payload": payload
        });
    });
}
- Services Handler
In Service Handler, we need to create a Handler and select the service that has to be linked with the Service Handler in A8QnA.

function doTask(params, state) {
    return new Promise((resolve, reject) => {
      logger.info("Carousel Handler", params.payload);
        resolve({
            "payload": JSON.stringify(params.payload)
        });
    });
}
Step 1: In the flow, select Execute code under The bot will:.
Step 2: Select a8Renderer from the drop-down list under Action to run.
Step 3: In the Action parameters section, fill in the necessary details under Name and Value respectively.
type: carousel
isDynamic: true
content: {{state.cardscore.carouselService.payload}}
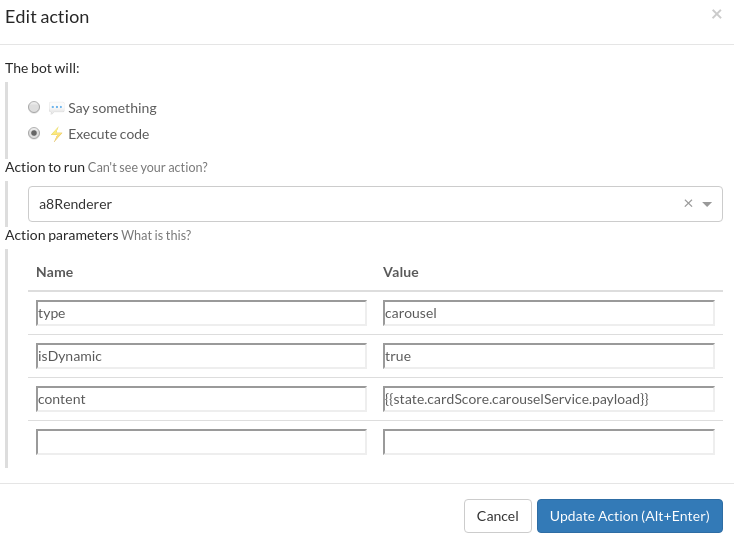
Chart-Dynamic
- Service
While creating serviceDispatcher, we need to create a Service and Service Handler in A8QnA.
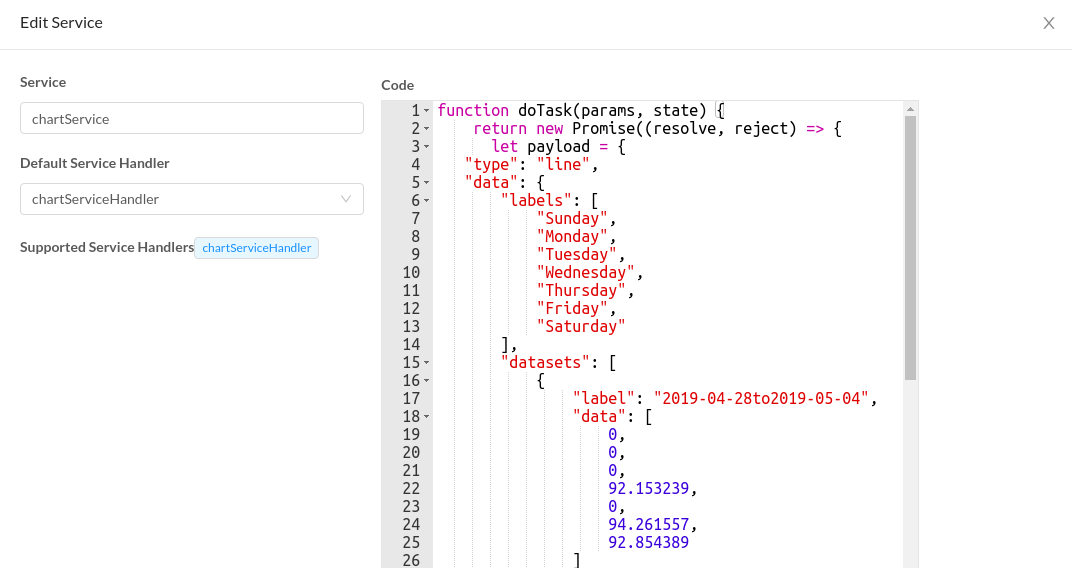
function doTask(params, state) {
    return new Promise((resolve, reject) => {
      let payload = {
   "type": "line",
   "data": {
       "labels": [
           "Sunday",
           "Monday",
           "Tuesday",
           "Wednesday",
           "Thursday",
           "Friday",
           "Saturday"
       ],
       "datasets": [
           {
               "label": "2019-04-28to2019-05-04",
               "data": [
                   0,
                   0,
                   0,
                   92.153239,
                   0,
                   94.261557,
                   92.854389
               ]
           },
           {
               "label": "2019-06-02to2019-06-08",
               "data": [
                   92.352717,
                   94.455682,
                   94.095291,
                   0,
                   0,
                   0,
                   93.492467
               ]
           }
       ]
   }

};
logger.info("Inside chart service:", payload);
        resolve({
            "payload": payload
        });
    });
}
- Services Handler
In Service Handler, we need to create a Handler and select the service that has to be linked with the Service Handler in A8QnA.
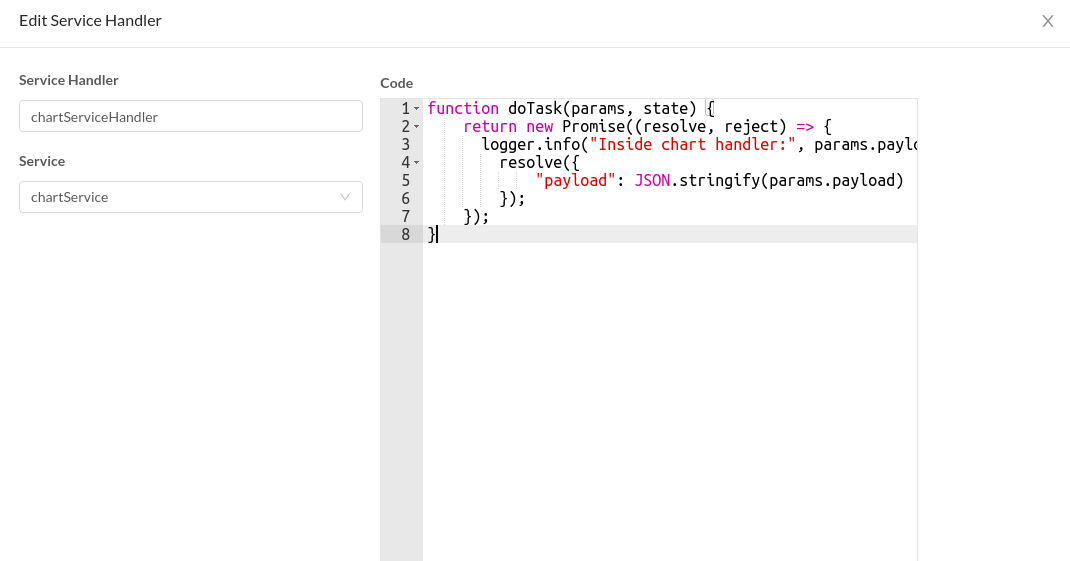
function doTask(params, state) {
    return new Promise((resolve, reject) => {
      logger.info("Inside chart handler:", params.payload);
        resolve({
            "payload": JSON.stringify(params.payload)
        });
    });
}
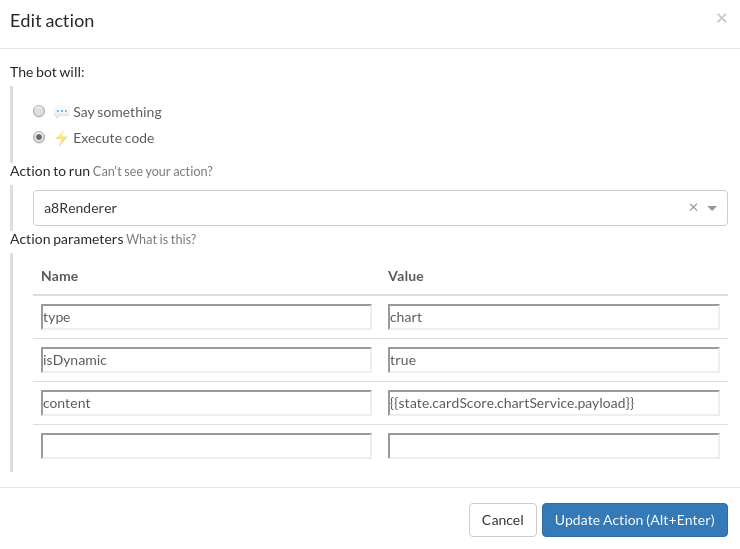
Step 1: In the flow, select Execute code under The bot will:.
Step 2: Select a8Renderer from the drop-down list under Action to run.
Step 3: In the Action parameters section, fill in the necessary details under Name and Value respectively.
type: chart
isDynamic: true
content: {{state.cardScore.chartService.payload}}

DataTable-Dynamic
- Service
While creating serviceDispatcher, we need to create a Service and Service Handler in A8QnA.
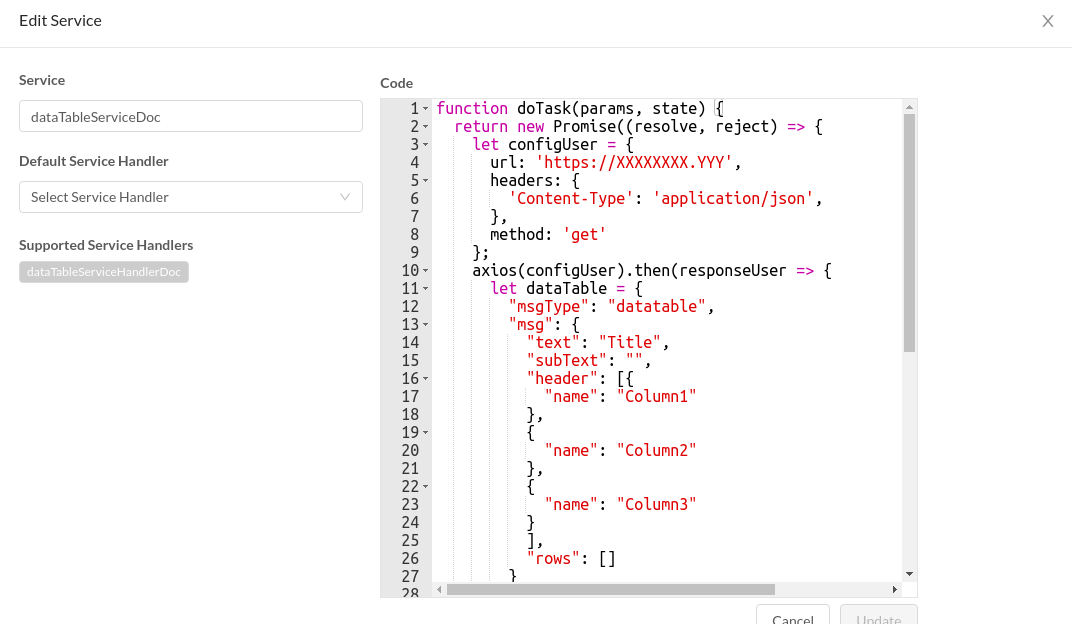
function doTask(params, state) {
  return new Promise((resolve, reject) => {
    let configUser = {
      url: 'https://XXXXXXXX.YYY',
      headers: {
        'Content-Type': 'application/json',
      },
      method: 'get'
    };
    axios(configUser).then(responseUser => {
      let dataTable = {
        "msgType": "datatable",
        "msg": {
          "text": "Title",
          "subText": "",
          "header": [{
            "name": "Column1"
          },
          {
            "name": "Column2"
          },
          {
            "name": "Column3"
          }
          ],
          "rows": []
        }
      };
      if (responseUser.status == 200 && responseUser.data !== null) {
        for (var iter = 0; iter < responseUser.data.length; iter++) {
          dataTable.msg.rows.push({
            "data": [
              responseUser.data[iter].column1data,
              responseUser.data[iter].column2data,
              responseUser.data[iter].column3data,
            ]
          });
        }
        resolve({
          "dataTable": dataTable
        });
      }
    }).catch(error => {
      console.log("Error in service");
      console.log("Error:", error);
      resolve({
        "error": true
      });
    });
  });
}
- Services Handler
In Service Handler, we need to create a Handler and select the service that has to be linked with the Service Handler in A8QnA.
function doTask(params, state) {
  return new Promise((resolve, reject) => {
    if (params.dataTable) {
      resolve({
        "dataTable": JSON.stringify(params.dataTable)
      });
    } else if (params.error) {
      resolve({
        "dataTable": null
      });
    }
  });
}
Step 1: In the flow, select Execute code under The bot will:.
Step 2: Select a8Renderer from the drop-down list under Action to run.
Step 3: In the Action parameters section, fill in the necessary details under Name and Value respectively.
type: datatable
isDynamic: true
contentId: state.nodename.servicename.value

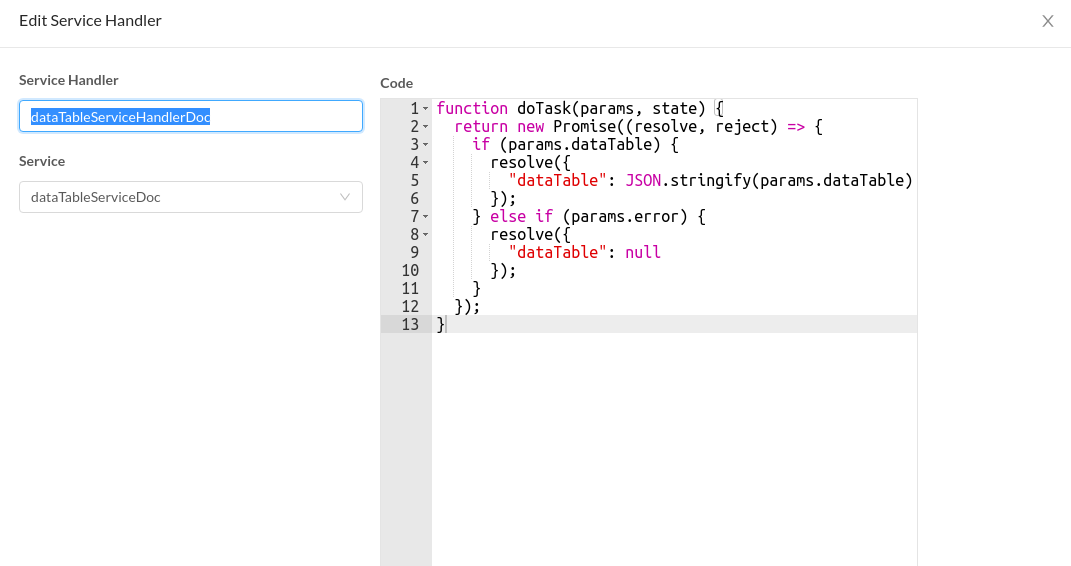
ImageUpload-Dynamic
- Service
While creating serviceDispatcher, we need to create a Service and Service Handler in A8QnA.
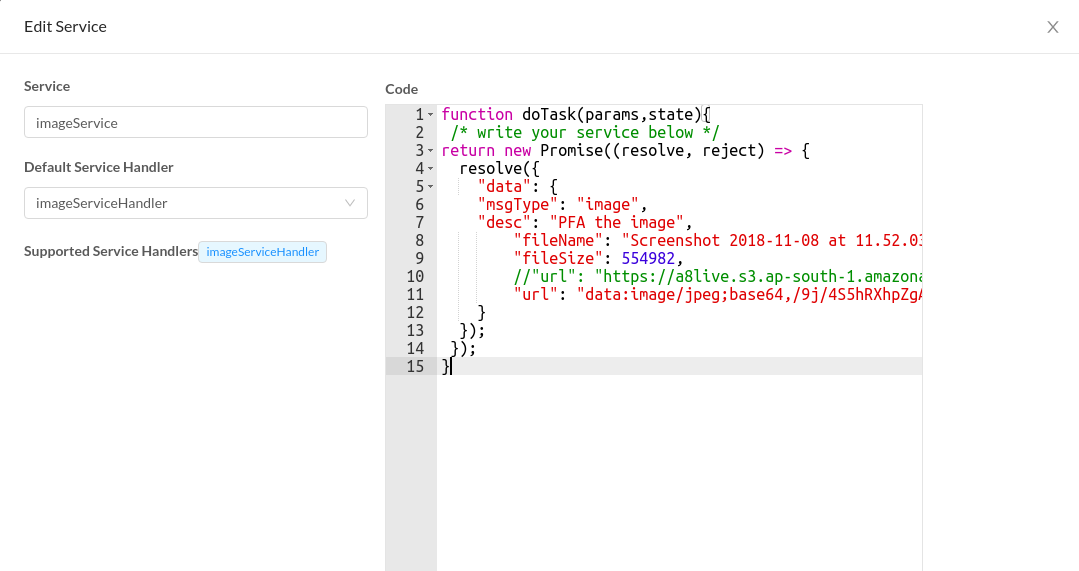
function doTask(params,state){
 /* write your service below */
return new Promise((resolve, reject) => {
  resolve({
    "data": {
    "msgType": "image",
    "desc": "PFA the image",
        "fileName": "Screenshot 2018-11-08 at 11.52.03 AM.png",
        "fileSize": 554982,
        "url": "https://a8live.s3.ap-south-1.amazonaws.com/org-5bd9b2842c1bd56ebadfbe93/clients/A8BOTe56a7906-e366-40fb-8689-2ce24b8d8a74/7fce0d60-255d-4af6-9a25-acf435e27e2f.png"
    }
  });
 });
}
- Services Handler
In Service Handler, we need to create a Handler and select the service that has to be linked with the Service Handler in A8QnA.
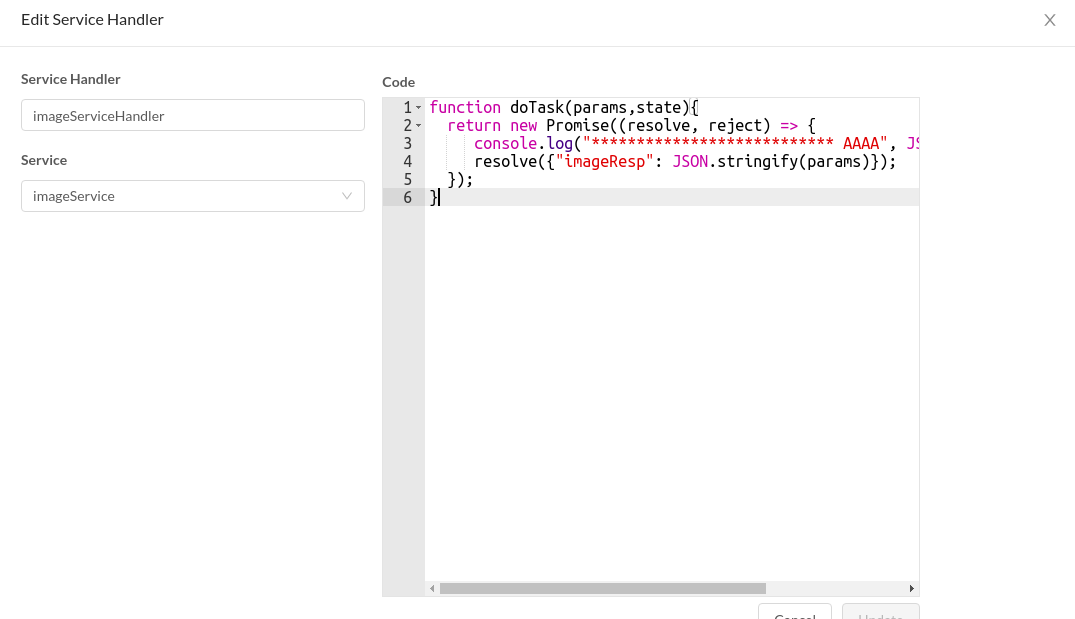
function doTask(params,state){
  return new Promise((resolve, reject) => {
     console.log("*************************** AAAA", JSON.stringify(params));
     resolve({"imageResp": JSON.stringify(params)});
  });
}
Step 1: In the flow, select Execute code under The bot will:.
Step 2: Select a8Renderer from the drop-down list under Action to run.
Step 3: In the Action parameters section, fill in the necessary details under Name and Value respectively.
type: datatable
isDynamic: true
contentId: state.nodename.servicename.value

A8 NLU
Tokens
Tokens are case insensitive. It, it, IT, and iT corresponds to IT.

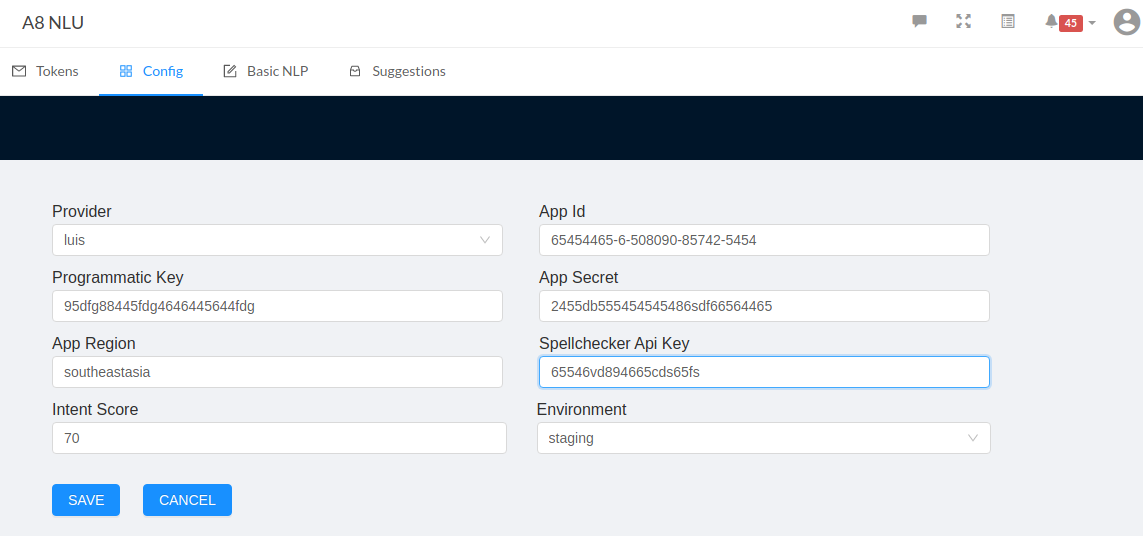
Config
There is currently no graphical interface on Botpress to manage the server or bot's configuration.
QnA Maker
QnA Maker is a cloud-based API service that lets you create a conversational question-and-answer layer over your existing data. Use it to build a knowledge base by extracting questions and answers from your semi-structured content, including FAQs, manuals, and documents. Answer users’ questions with the best answers from the QnAs in your knowledge base—automatically. Your knowledge base gets smarter, too, as it continually learns from the user behavior.
Step 1: To create a QnA Maker we need to create a Knowledge base.
Step 2: To creating a Knowledge base, refer here.
Step 3: After creating the Knowledge base, we need to create properties in QnA Makers. With the help of the given link, we can create a list of properties in it. https://docs.microsoft.com/en-us/rest/api/cognitiveservices/qnamakerruntime/runtime/generateanswer
- Name
- RuntimeEndpoint
- kbId
- Authorization
- Threshold

Step 4: After creating it, we need to add the created QnA Maker in the Dialogues as an Intent.
Basic NLP
Step 1: To create the intent, go to Dialogues tab in QnA.
Step 2: Click Create dialogues to open the Create Dialogue popup.
Step 3: Provide a required title.
Step 4: From the select dialogue dropdown list, choose Intent and name it based on the Intent with which Dialogues are created.
Step 5: Select a required response from the drop-down list.
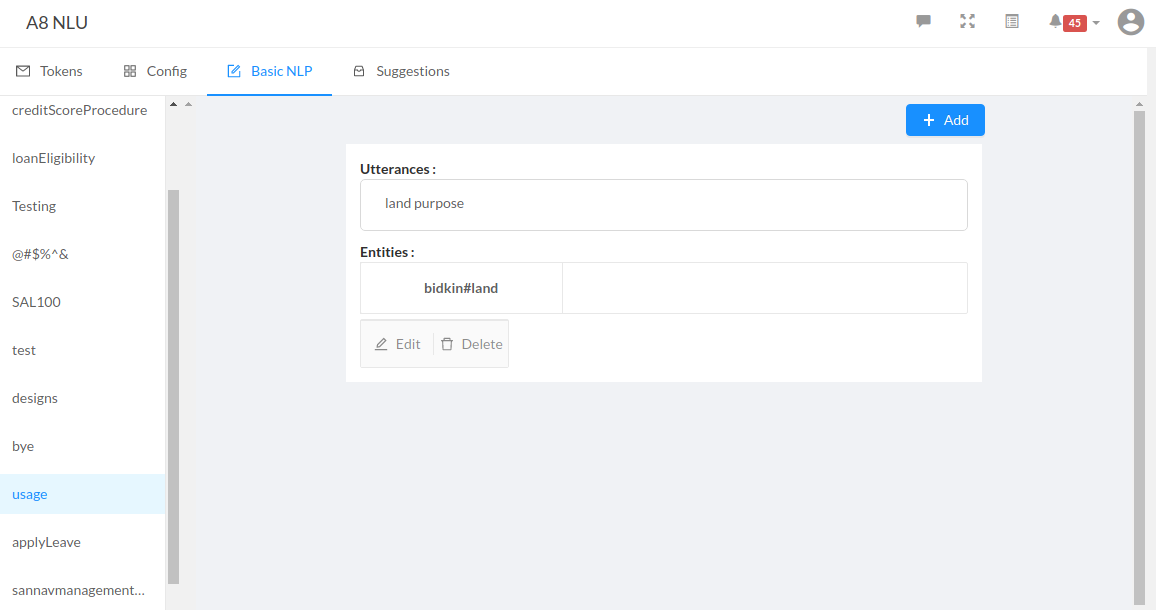
Step 6: After creating the intent in QnA, we can view the same intent name in Basic NLP present in NLU.
Step 7: Select the Intent name that was created in QnA and add an icon.
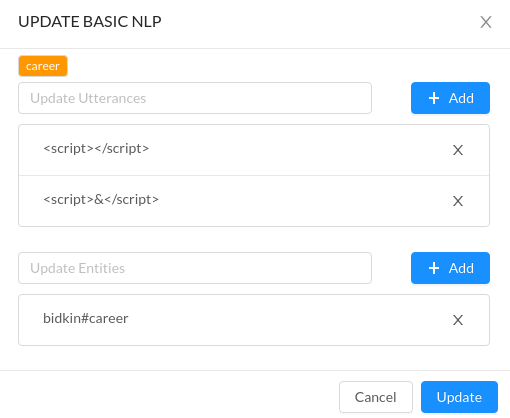
Step 9: Once we click Add icon, we can view a popup. Add the Utterances and Entities in the pop-up. Capital letters should not be used while creating Utterances and Entities.
Utterances are questions of the users that they expect with an user response.
Entities are based on the entity and the type that we get from LUIS End [URL](https://southeastasia.api.cognitive.microsoft.com/luis/v2.0/apps/{AppId}?verbose=true&timezoneOffset=-360&subscription-key={AppSecret}&q="Intent name").
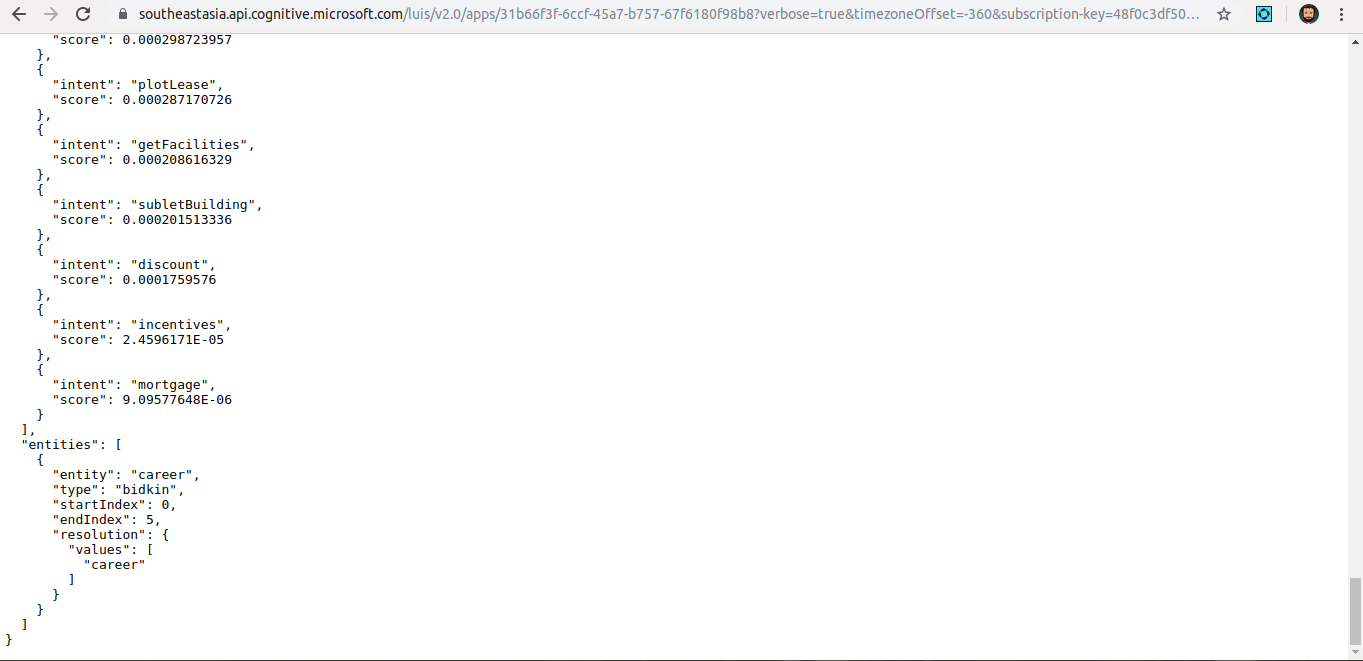
Step 10: In Entities, the format that has to be followed is entity#career.
Output
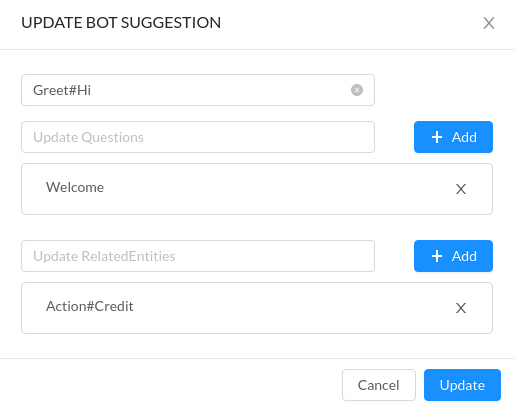
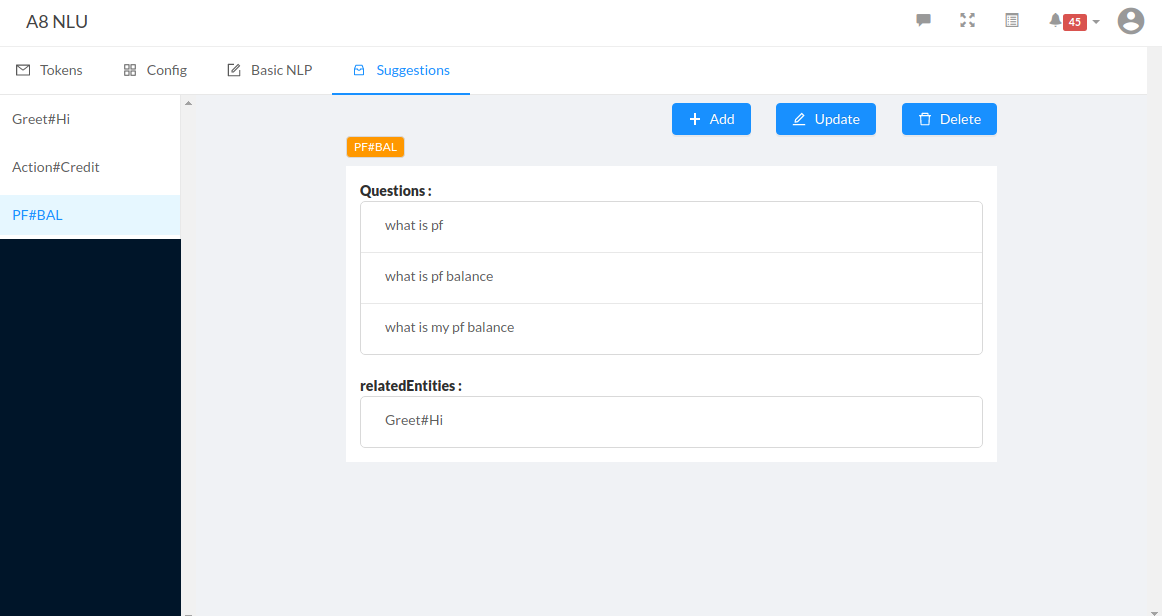
Suggestions
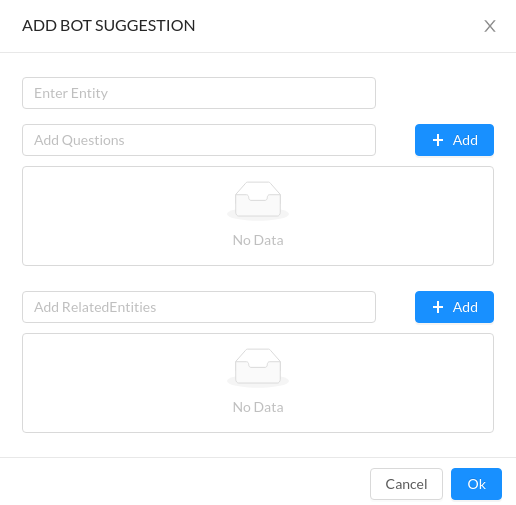
Step 1: To create Suggestions, click Add icon to view the pop-up.
Step 2: Entity, Add Questions, and Add RelatedEntity can be viewed in the pop-up.
Step 3: Entities are based on the entity and the type that we get from LUIS End [URL](https://southeastasia.api.cognitive.microsoft.com/luis/v2.0/apps/{AppId}?verbose=true&timezoneOffset=-360&subscription-key={AppSecret}&q="Intent name").
Step 4: In Entities, the format that has to be followed is type#values. Value can be taken from the End URL.
Step 5: In the Questions tab, we should enable Suggestions in the widget.
Step 6: RelatedEntities are used to connect with some other Entities. Multiple Entities will be needed as a suggestion for a Single LUIS.
A8 QnA
Contexts listed in the dropdown list are sourced from all the existing content (questions & NLU intents). The QnA,json configuration file is no longer used to provide a list of contexts. To create a new context, open or add a Q&A, input the context in the Contexts field, then select it.
Service (Access the Botpress Content Manager)
- Service
function doTask(params, state) {
    return new Promise(async (resolve, reject) => {
        const option1 = await contentManager.getItem("builtin_text-HQEot3");
        const option2 = await contentManager.getItem("builtin_text-VVJu8g");
         let simpleChoice = {
        "msgType": "simpleChoice",
        "msg": {
            "text": "Select a tax Choice",
            "style": {
                "orientation": "V"
            },
            "choices": [{
                    "id": "1",
                    "label": option1.data.text,
                    "masked": true
                },
                {
                    "id": "2",
                    "label": option2.data.text,
                    "masked": true
                }]
        }
    };
        resolve({
            "simpleChoice": simpleChoice
        });
    });
}
- Services Handlers
function doTask(params, state) {
  return new Promise((resolve, reject) => {
    console.log("Inside handler");
      logger.info(params.simpleChoice);
    if (params.simpleChoice) {
      console.log("simpleChoice handler :", params.simpleChoice);
      resolve({
        "simpleChoice": JSON.stringify(params.simpleChoice)
      });
    } else if (params.error) {
      resolve({
        "simpleChoice": null
      });
    }
  });
}
Facebook
This is used to initiate an interaction between the bot and facebook users.
Step 1: In Facebook supporting document, we need simple choice, text, and a link.
Step 2: To create an interaction between the bot and QnA response, it should be created as an intent or event in the QnA. Check the image below for referrence.
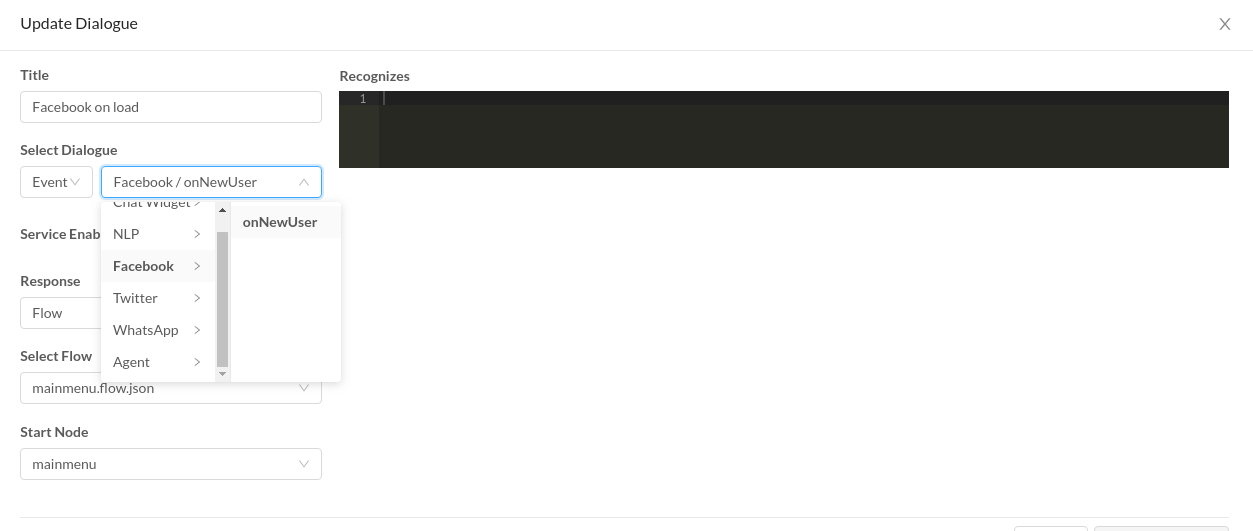
Step 3: Unique responses are provided page wise. This can be handled by specifying Page ID in Qna > Dialogues > Recognizes.
Step 4: In the Recognizes tab, pageID should be entered as given below.
user.chennelData.pageID == "1234567890"
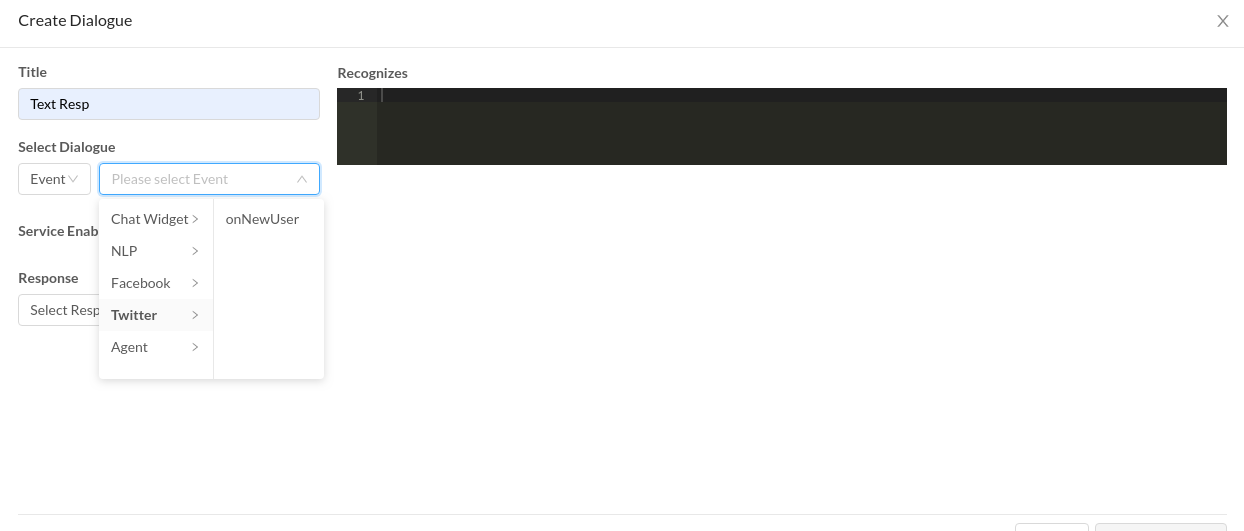
Twitter
This is used to initiate an interaction between the bot and twitter users.
Step 1: In Facebook supporting document, we need simple choice, text, and a link.
Step 2: To create an interaction between the bot and QnA response, it should be created as an intent or event in the QnA. Check the image below for referrence.
WhatsApp
We are using Gubshup and Twilio for getting the bot messages in WhatsApp.
Step 1: In Facebook supporting document, we need simple choice, text, and a link.
Step 2: To create an interaction between the bot and QnA response, it should be created as an intent or event in the QnA. Check the image below for referrence.
WhatsApp, Facebook, and Twitter
HyperLink
While creating the bots for WhatsApp, Facebook, and Twitter, we need to add a "JSON" file in the Raw Payload.
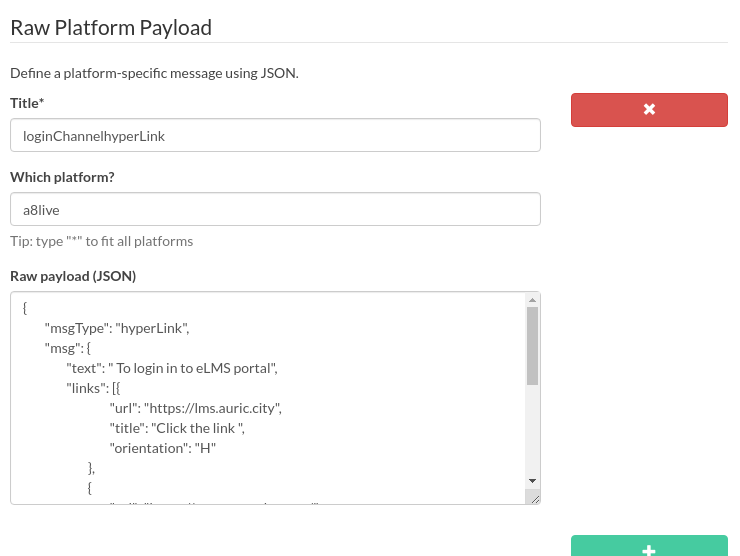
{
"msgType": "hyperLink",
"msg": {
    "text": "Get the weather here",
    "links": [{
         "url": "https://weather.com/",
         "title": "Go to",
         "orientation": "V"
               }]
           }
}
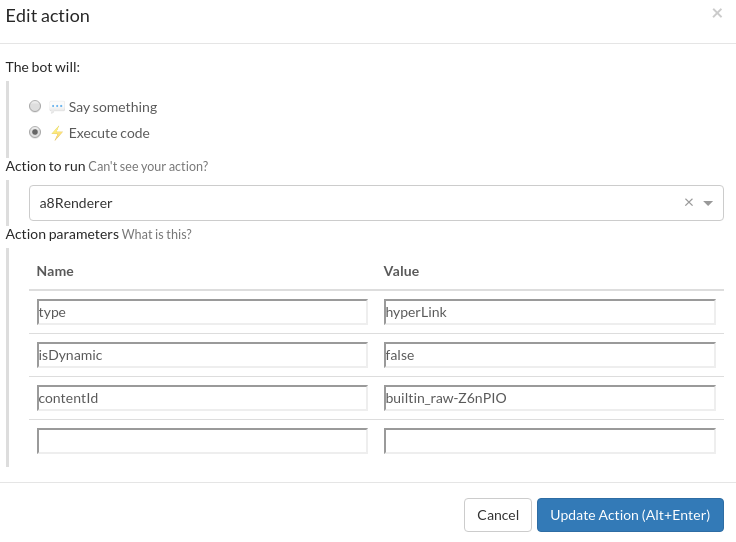
After creating the Raw Payload, we need to create a flow.
Step 1: In the flow, select Execute code under The bot will:.
Step 2: Select a8Renderer from the drop-down list under Action to run.
Step 3: In the Action parameters section, fill in the necessary details under Name and Value respectively.
type: hyperLink(The value is based on the name which is given in the Raw Payload)
isDynamic: false
contentId: builtin_raw-Z6nPIO(We can get the contentId value from the Raw Payload which we have created in Payload)
Step 4: In the Transition tab, set the condition to validate before traveling to the next node. Click + icon to open the Transitiion tab and to add the raw expressions for each choice.
The sample raw expressions are given below for your reference. The ID,value, and label are pointing the value given in the Raw Payload.
{{event.raw.payload.msg.type}}
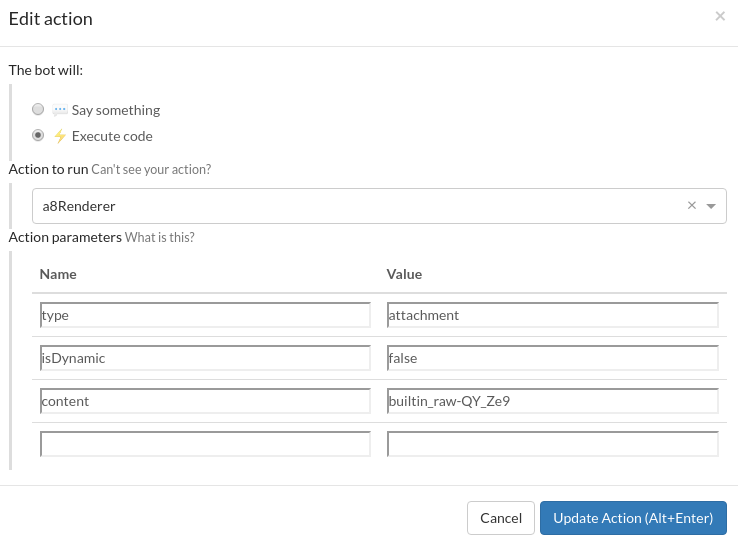
Attachments - Image/Video/Audio/File
While creating the bots for WhatsApp, Facebook, and Twitter, we need to add a "JSON" file in the Raw Payload.
{
"msgType": "image",
"msg": {
      "caption": "Thank You",
      "url": "https://commonlyusedwords.com/wp-content/uploads/2019/06/Thank-You.jpg"
           }
}
After creating the Raw Payload, we need to create a flow.
Step 1: In the flow, select Execute code under The bot will:.
Step 2: Select a8Renderer from the drop-down list under Action to run.
Step 3: In the Action parameters section, fill in the necessary details under Name and Value respectively.
type: hyperLink(The value is based on the name given in the Raw Payload)
isDynamic: false
contentId: builtin_raw-Z6nPIO(We can get the contentId value from the Raw Payload which we have created in Payload)
Step 4: In the Transition tab, set the condition to validate before traveling to the next node. Click + icon to open the Transitiion tab and to add the raw expressions for each choice.
The sample raw expressions are given below for your reference. The ID,value, and label are pointing the value given in the Raw Payload.
{{event.raw.payload.msg.url}}
Actions
In Actions, inbuild service library exists based on the below types.
- markdown
- axios
- crypto
- url
- logger
- eventLogger
- moment
- A8service
Logger
Eg.:
logger.error("hi")
logger.info("hi")
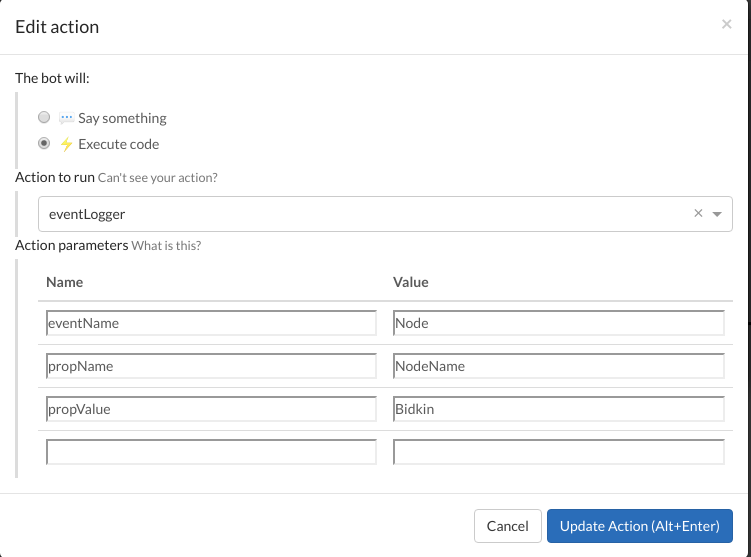
eventLogger
This is used to log the custom event.
Eg.: To find the rate of success or failure for A8service.
Step 4: In the Transition tab, set the condition to validate before traveling to the next node. Click + icon to open the Transitiion tab and to add the raw expressions for each choice.
The sample raw expressions are given below for your reference. The ID,value, and label are pointing the value given in the Raw Payload.
{{event.raw.payload.msg.url}}